2015 Kawasaki KX250F Owners Manual - Page 124
2015 Kawasaki KX250F Manual

Page 124 highlights
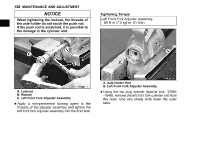
MAINTENANCE AND ADJUSTMENT 123 the extra oil off the left front fork cylinder • Discharge unit by pumping the piston rod to full stroke. the extra oil from the left front fork cylinder • Drain unit oil hole. out the extra oil from the oil hole of the left • Blow front fork cylinder unit with the compressed air the oil off completely from the fork cylinder • Wipe unit. you cannot use compressed air, remove the air • If pressure relief screw of the left front fork base valve assembly. Up side down the fork damper for more than 10 minutes and drain the oil from the left front fork cylinder unit. Reinstall and tighten the air pressure relief screw. blow to the oil hole. NOTICE Be careful not to bend or damage the piston rod when the piston rod is stroked. Service carefully because oil flies out from the oil holes of the left front fork cylinder unit. j Tightening Torque Air Pressure Relief Screw: 1.3 N·m (0.13 kgf·m, 12 in·lb) A. Piston Rod B. Heavy Cloth C. Pump the piston. ○Set the compression damping force setting to the softest. Check the piston rod sliding surface for damage. Apply specified fork oil to the piston rod sliding surface. A. Oil Hole NOTE
-
 1
1 -
2
-
3
-
4
-
5
-
6
-
7
-
8
-
9
-
10
-
11
-
12
-
13
-
14
-
15
-
16
-
17
-
18
-
19
-
20
-
21
-
22
-
23
-
24
-
25
-
26
-
27
-
28
-
29
-
30
-
31
-
32
-
33
-
34
-
35
-
36
-
37
-
38
-
39
-
40
-
41
-
42
-
43
-
44
-
45
-
46
-
47
-
48
-
49
-
50
-
51
-
52
-
53
-
54
-
55
-
56
-
57
-
58
-
59
-
60
-
61
-
62
-
63
-
64
-
65
-
66
-
67
-
68
-
69
-
70
-
71
-
72
-
73
-
74
-
75
-
76
-
77
-
78
-
79
-
80
-
81
-
82
-
83
-
84
-
85
-
86
-
87
-
88
-
89
-
90
-
91
-
92
-
93
-
94
-
95
-
96
-
97
-
98
-
99
-
100
-
101
-
102
-
103
-
104
-
105
-
106
-
107
-
108
-
109
-
110
-
111
-
112
-
113
-
114
-
115
-
116
-
117
-
118
-
 119
119 -
 120
120 -
 121
121 -
 122
122 -
 123
123 -
 124
124 -
 125
125 -
 126
126 -
 127
127 -
 128
128 -
 129
129 -
130
-
131
-
132
-
133
-
134
-
135
-
136
-
137
-
138
-
139
-
140
-
141
-
142
-
143
-
144
-
145
-
146
-
147
-
148
-
149
-
150
-
151
-
152
-
153
-
154
-
155
-
156
-
157
-
158
-
159
-
160
-
161
-
162
-
163
-
164
-
165
-
166
-
167
-
168
-
169
-
170
-
171
-
172
-
173
-
174
-
175
-
176
-
177
-
178
-
179
-
180
-
181
-
182
-
183
-
184
-
185
-
186
-
187
-
188
-
189
-
190
-
191
-
192
-
193
-
194
-
195
-
196
-
197
-
198
-
199
-
200
-
201
-
202
 |
 |
