3Com NJ220 User Manual - Page 14
Setting up the Network Cabling at Your Site, Connecting the IntelliJack to the Network
 |
UPC - 662705476865
View all 3Com NJ220 manuals
Add to My Manuals
Save this manual to your list of manuals |
Page 14 highlights
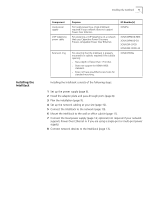
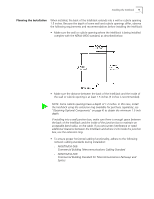
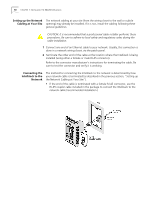
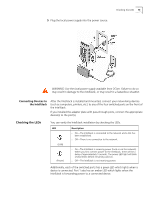
10 CHAPTER 1: INSTALLING THE NJ220 INTELLIJACK Setting up the Network The network cabling at your site (from the wiring closet to the wall or cubicle Cabling at Your Site opening) may already be installed. If it is not, install the cabling following these general guidelines. CAUTION: It is recommended that a professional cable installer performs these procedures. Be sure to adhere to local safety and regulatory codes during the cable installation. 1 Connect one end of an Ethernet cable to your network. Usually, this connection is done in a network wiring closet, via the patch panel. 2 Terminate the other end of the cable at the location where the IntelliJack is being installed (using either a female or male RJ-45 connector). Refer to the connector manufacturer's instructions for terminating the cable. Be sure to test the connector and verify it is working. Connecting the IntelliJack to the Network The method for connecting the IntelliJack to the network is determined by how your network cable is terminated (as described in the previous section, "Setting up the Network Cabling at Your Site"). • If the end of the cable is terminated with a female RJ-45 connector, use the RJ-45 coupler cable included in the package to connect the IntelliJack to the network cable (recommended installation.)
-
 1
1 -
2
-
3
-
4
-
5
-
6
-
7
-
8
-
 9
9 -
 10
10 -
 11
11 -
 12
12 -
 13
13 -
 14
14 -
 15
15 -
 16
16 -
 17
17 -
 18
18 -
 19
19 -
20
-
21
-
22
-
23
-
24
-
25
-
26
-
27
-
28
-
29
-
30
-
31
-
32
-
33
-
34
-
35
-
36
-
37
-
38
-
39
-
40
-
41
-
42
-
43
-
44
-
45
-
46
-
47
-
48
-
49
-
50
-
51
-
52
-
53
-
54
-
55
-
56
-
57
-
58
-
59
-
60
-
61
-
62
-
63
-
64
-
65
-
66
-
67
-
68
-
69
-
70
-
71
-
72
-
73
-
74
-
75
-
76
-
77
-
78
-
79
-
80
-
81
-
82
 |
 |
