Archos 501313 User Manual - Page 14
The List Of Available Networks, Advanced Connection
 |
View all Archos 501313 manuals
Add to My Manuals
Save this manual to your list of manuals |
Page 14 highlights
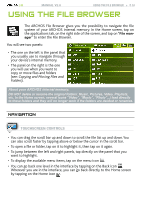
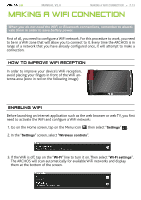
| 5 MANUAL V2.0 • When the WiFi is enabled, the ARCHOS will connect automatically to your configured networks when they are in range. • If the ARCHOS finds a network that has never been configured, it will display a notification icon in the top left corner of the interface. Drag the top bar downwards to reveal the notification message and tap on it to view available WiFi networks. Making a WiFi Connection > P. 14 The list of available networks • The list of available networks shows all the wireless networks in range of your device. • The list is constantly refreshed automatically. • Tap on the network you want to connect to, enter the required network informa- tion* and then tap on "Connect". Your ARCHOS will now attempt to establish a connection to that WiFi hot spot with the network parameters you entered. * For free access WiFi points, there is no need to enter any special information. For secured networks, you will need either a key (a series of numbers and/or letters) of the type WEP, WPA, or WPA2, or you will need to have a WiFi access point that uses the WiFi protection standard WPS (WiFi Protected Setup). Check with the person who manages the WiFi network to obtain the exact connection parameters required. advanced connection • To manually scan for available WiFi networks, on the "Wi-Fi settings" screen, tap on the Menu icon , then tap on "Scan". • If the WiFi network you want to connect to does not appear in the list, scroll down the screen, then tap on "Add a Wi-Fi network". Enter the required settings, then tap on "Save". • To access the advanced network parameters ("Regulatory domain", "IP address", etc), tap on the Menu icon , then tap on "Advanced". Other parameters will appear: the required information can be obtained from the person who manages the network.
-
 1
1 -
2
-
3
-
4
-
5
-
6
-
7
-
8
-
 9
9 -
 10
10 -
 11
11 -
 12
12 -
 13
13 -
 14
14 -
 15
15 -
 16
16 -
 17
17 -
 18
18 -
 19
19 -
20
-
21
-
22
-
23
-
24
-
25
-
26
-
27
-
28
-
29
-
30
-
31
-
32
-
33
-
34
-
35
-
36
-
37
-
38
-
39
-
40
-
41
-
42
-
43
-
44
-
45
-
46
-
47
-
48
-
49
-
50
-
51
-
52
-
53
-
54
-
55
 |
 |