Asus DA-3000 Owners Manual - Page 12
EXIT/CANCEL [PEAK CLEAR] Button, RECORD [TRK INC] button/indicator
 |
View all Asus DA-3000 manuals
Add to My Manuals
Save this manual to your list of manuals |
Page 12 highlights
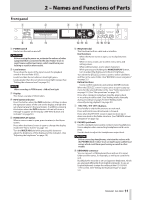
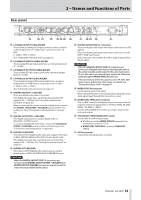
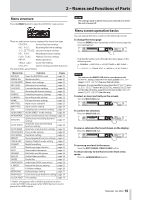
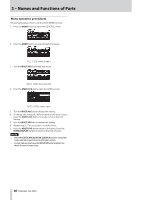
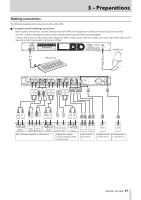
2 - Names and Functions of Parts 0 DEVICE connector Use to connect a USB flash drive. (See "Connecting/disconnecting USB flash drives" on page 21.) Connect a USB flash drive here to play back files on it and copy files between it and SD/CF cards. (See "Copying files between media (backing up)" on page 50.) q SD and CF card slots Insert and eject SD and CF cards from here. (See "Inserting and ejecting SD and CF cards" on page 20.) w Remote sensor Receives signals from the included remote control (TASCAM RC-10). When using the remote point it here. e MENU button When the Home Screen is open, press to access the menu screens. (See "Menu structure" on page 15.) (See "Menu screen operation basics" on page 15.) r EXIT/CANCEL [PEAK CLEAR] Button Press this when a settings screen is open to go back one level in the menu. When a confirmation pop-up message is open, press this to answer "NO". When the Home Screen is open, press this to clear the level meter peak hold indicators. t STOP button Stops playback and recording. y PLAY button/indicator Press when stopped or in playback standby to start playback. Press in recording standby to start recording. During playback or recording, this button lights. u PAUSE button/indicator Press when stopped or during playback to switch to playback standby. Press when recording to switch to recording standby. The button lights when in playback standby and recording standby. i RECORD [TRK INC] button/indicator Press when stopped to start recording standby. Press when recording to start a new track and continue recording without interruption. (See "Creating a higher numbered track manually" on page 28.) The button lights when recording and in recording standby. Press when there is no media in the current device to activate input monitoring, causing the currently selected input signal to be output. The button blinks during input monitoring. 12 TASCAM DA-3000
-
 1
1 -
2
-
3
-
4
-
5
-
6
-
 7
7 -
 8
8 -
 9
9 -
 10
10 -
 11
11 -
 12
12 -
 13
13 -
 14
14 -
 15
15 -
 16
16 -
 17
17 -
18
-
19
-
20
-
21
-
22
-
23
-
24
-
25
-
26
-
27
-
28
-
29
-
30
-
31
-
32
-
33
-
34
-
35
-
36
-
37
-
38
-
39
-
40
-
41
-
42
-
43
-
44
-
45
-
46
-
47
-
48
-
49
-
50
-
51
-
52
-
53
-
54
-
55
-
56
-
57
-
58
-
59
-
60
 |
 |
