Asus DA-3000 Owners Manual - Page 43
Connecting and setting the devices, Connections, Settings
 |
View all Asus DA-3000 manuals
Add to My Manuals
Save this manual to your list of manuals |
Page 43 highlights
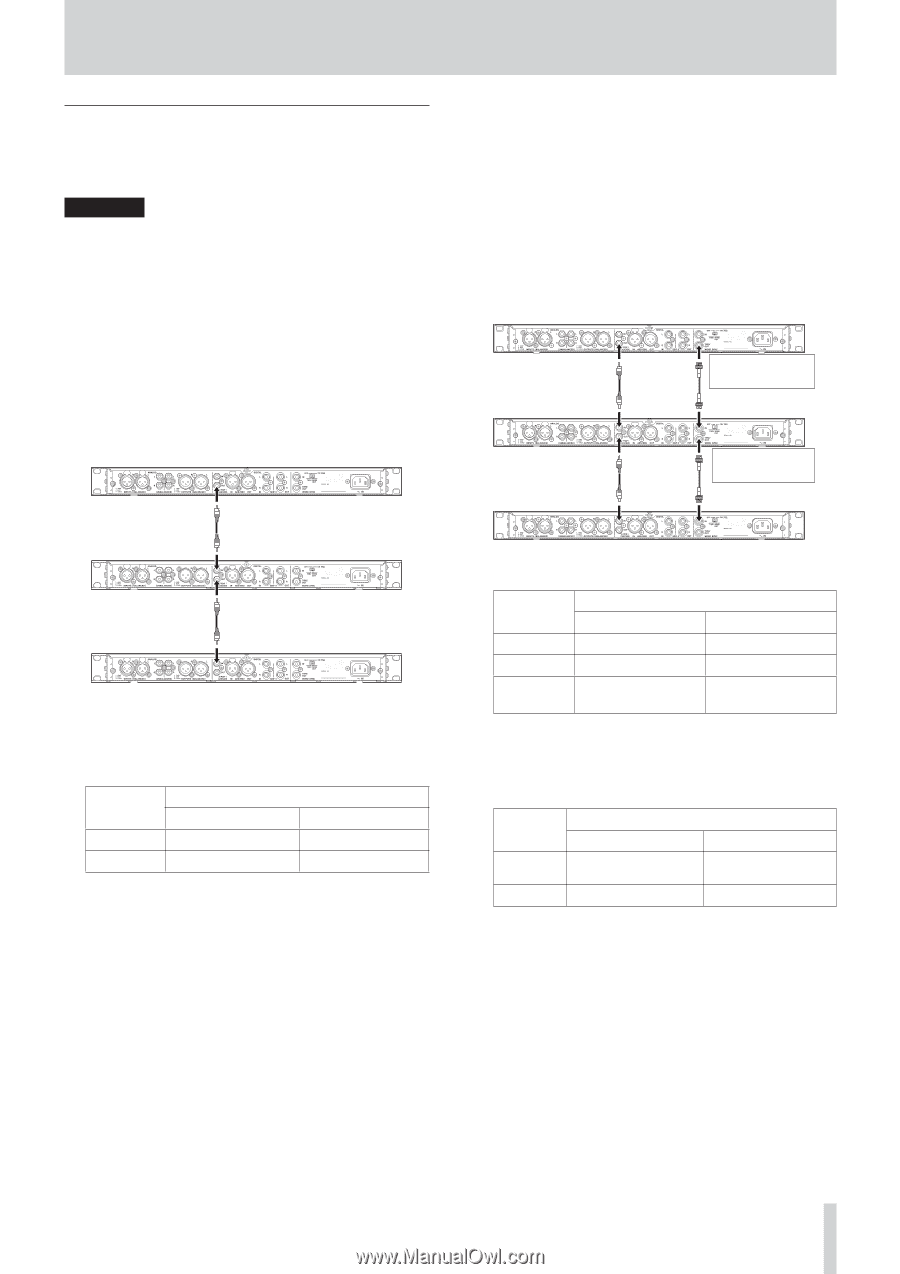
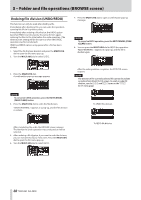
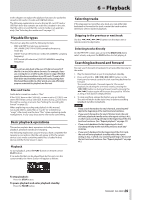
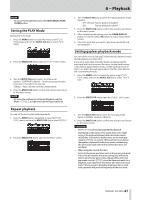
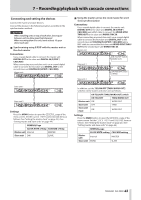
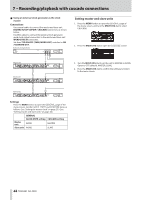
7 - Recording/playback with cascade connections Connecting and setting the devices Connect the master and slave devices. Connect the devices in the following manner according to the synchronization method. CAUTION When installing units on top of each other, leave space between units to allow good heat dispersal. When mounting them in a rack, leave at least 1U open above each unit. 88 Synchronizing using S/PDIF with the master unit as the clock master Connections Use a coaxial digital cable to connect the master unit DIGITAL OUT to the slave unit DIGITAL IN (S/PDIF / CASCADE). When connecting a second slave unit, use a coaxial digital cable to connect the first slave unit DIGITAL OUT to the second slave unit DIGITAL IN (S/PDIF / CASCADE). Master unit Slave unit 1 Slave unit 2 Settings Press the MENU button to open the GENERAL page of the menu screen. Set the CLOCK MSTR and CASCADE items as follows. (See "Setting the master clock" on page 25.) (See "Setting master and slave units" on page 44.) GENERAL Page CLOCK MSTR setting CASCADE setting Master unit Internal MASTER Slave unit DIN SLAVE 88 Using the master unit as the clock master for word clock synchronization Connections Use a coaxial digital cable to connect the master unit DIGITAL OUT to the slave unit DIGITAL IN (S/PDIF / CASCADE) and a BNC cable to connect the WORD SYNC THRU/OUT to the slave unit WORD SYNC IN. When connecting a second slave unit, use a coaxial digital cable to connect the first slave unit DIGITAL OUT to the second slave unit DIGITAL IN (S/PDIF / CASCADE) and a BNC cable to connect the first slave unit WORD SYNC THRU/ OUT to the second slave unit WORD SYNC IN. Master unit Slave unit 1 ON 75Ω/OFF switch (WORD OUT) Slave unit 2 ON 75Ω/OFF switch (THRU) In addition, set the 75Ω ON/OFF [THRU/WORD OUT] switches on the master and slave units as follows. ON 75Ω/OFF [THRU/WORD OUT] switch ON 75Ω/OFF Master unit ON THRU/WORD OUT WORD OUT Slave unit OFF Slave unit ON (last) THRU WORD OUT Settings Press the MENU button to open the GENERAL page of the menu screen. Set the CLOCK MSTR and CASCADE items as follows. (See "Setting the master clock" on page 25.) (See "Setting master and slave units" on page 44.) GENERAL page Master unit Slave unit CLOCK MSTR setting Internal WORD CASCADE setting MASTER SLAVE TASCAM DA-3000 43
-
 1
1 -
2
-
3
-
4
-
5
-
6
-
7
-
8
-
9
-
10
-
11
-
12
-
13
-
14
-
15
-
16
-
17
-
18
-
19
-
20
-
21
-
22
-
23
-
24
-
25
-
26
-
27
-
28
-
29
-
30
-
31
-
32
-
33
-
34
-
35
-
36
-
37
-
 38
38 -
 39
39 -
 40
40 -
 41
41 -
 42
42 -
 43
43 -
 44
44 -
 45
45 -
 46
46 -
 47
47 -
 48
48 -
49
-
50
-
51
-
52
-
53
-
54
-
55
-
56
-
57
-
58
-
59
-
60
 |
 |