Asus DA-3000 Owners Manual - Page 40
Locating to specific positions, Locating to a position after partial entry
 |
View all Asus DA-3000 manuals
Add to My Manuals
Save this manual to your list of manuals |
Page 40 highlights
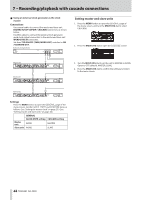
6 − Playback Locating to specific positions If you use a USB keyboard with a number pad or a USB number pad, you can locate to specific positions when the unit is stopped, playing back or in playback standby. Press the * (asterisk) key to clear the track number and time display and prepare the unit to receive numeric input. Use the numeric keypad to enter numbers in the following order. p Track number: 3 digits p Elapsed time from track beginning: 2 digits each for hours, minutes, seconds For example, if you want to specify a location that is 1 minute 30 seconds from the beginning of track 2, you would press keys in the following order. 0 w 0 w 2 w 0 w 0 w 0 w 1 w 3 w 0 When you finish entering the nine digits, the unit will automatically locate to the specified position. After locating to the new position, the unit will resume the same status as before (stopped, in playback standby or playing back). This means playback will start automatically from the located position only during playback Locating to a position after partial entry If you press the press the MULTI JOG dial, PLAY button or PAUSE button on the front panel (or remote control PLAY button or F1 button) before you finish entering the time, you will locate to the position that is specified at that point. For example, suppose you input only: 0 w 0 w 2 w 0 w 0 w 1 w 2 Then, if you press the MULTI JOG dial, PLAY button or PAUSE button, the unit will locate to 12 minutes after the beginning of track 2. The button pressed when locating determines what happens after locating. MULTI JOG dial pressed: The unit resumes playback or playback standby according to the status before locating. PLAY button pressed: Playback starts. PAUSE button pressed: The unit enters playback standby. Remote control PLAY button pressed: If playing back before locating, playback pauses after locating. If stopped or in playback standby before locating, playback starts after locating. Adding marks manually during playback When stopped, when in playback standby or during playback, you can add marks manually to the track in any positions you like. During track playback, you can move quickly to marks. Adding marks during playback When a track is stopped, playing back or in playback standby, press the MULTI JOG dial (or remote control MARK button) at any point where you want to add a mark. NOTE • Each track can store information for a maximum of 99 added marks. • You can also add marks during recording. (See "Adding marks manually during recording" on page 29.) • When adding a mark manually, the Mark Name "MARKxxx" * is used. * "xxx" is a number that increments through all MARKs in this track. Locating to marks When a track is stopped, playing back or in playback standby, you can turn the MULTI JOG dial (or use the remote control F3 [+]/F4 [−] buttons) to locate to marks. Turn the MULTI JOG dial right to locate to the nearest later mark or left to locate to the nearest previous mark from the current position. When locating to a MARK point, that MARK point's name is displayed in the button section of the HOME screen. Also, if a MARK point is passed during playback, that MARK point's name is also displayed. By pressing the HOME/DISPLAY button, the MARK Point name for the current position is also displayed. Deleting marks You can delete an added mark when stopped or when in playback standby. 1. Move to the mark that you want to delete. (See "Locating to marks" on page 40.) 2. Press the MULTI JOG dial to open the DELETE MARKS pop-up. 3. Turn the MULTI JOG dial to select whether to delete one mark or all marks in a file. Options: SINGLE: Delete only the selected mark. ALL: Delete all the marks added to the current file. 4. Press the MULTI JOG dial to delete the mark or marks. If you selected SINGLE, the Home Screen will reappear after the selected mark is deleted. If you selected ALL, a confirmation pop-up message will appear. 40 TASCAM DA-3000 Press the MULTI JOG dial again to delete all the marks added to the current file. The Home Screen will reappear after all the marks are deleted.
-
 1
1 -
2
-
3
-
4
-
5
-
6
-
7
-
8
-
9
-
10
-
11
-
12
-
13
-
14
-
15
-
16
-
17
-
18
-
19
-
20
-
21
-
22
-
23
-
24
-
25
-
26
-
27
-
28
-
29
-
30
-
31
-
32
-
33
-
34
-
 35
35 -
 36
36 -
 37
37 -
 38
38 -
 39
39 -
 40
40 -
 41
41 -
 42
42 -
 43
43 -
 44
44 -
 45
45 -
46
-
47
-
48
-
49
-
50
-
51
-
52
-
53
-
54
-
55
-
56
-
57
-
58
-
59
-
60
 |
 |
