Brother International ™ QL-1050 Software Users Manual - English - Page 12
Creating Different Types of Labels
 |
View all Brother International ™ QL-1050 manuals
Add to My Manuals
Save this manual to your list of manuals |
Page 12 highlights
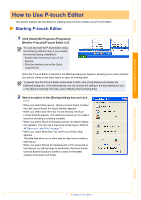
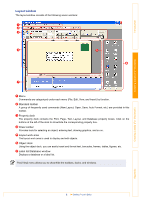
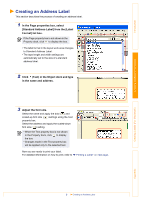
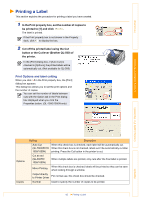
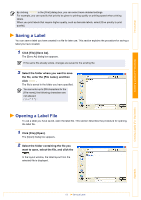
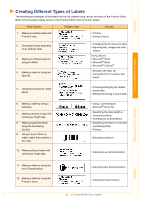
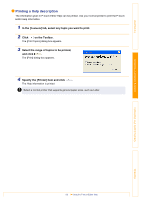
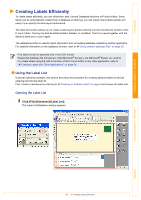
Introduction Creating Labels (For Windows) Creating Different Types of Labels The following are examples of the labels that can be created using various functions of the P-touch Editor. Refer to the Creating Labels section in the P-touch Editor Help for further details. Help Section Sample Label Process 1: Making an address label with P-touch Editor • Printing • Saving a layout 2: Changing the text properties of an address label 3: Making an address label by using an Add-in 4: Making a label by using the label list • Changing the font size and style • Adjusting text, images and other objects Using add-ins • Microsoft® Word • Microsoft® Excel • Microsoft® Outlook® • Saving to the label list • Using label list to create a new layout 5: Using layout styles to create labels • Choosing/Changing the default layout style • Editing and saving a layout style 6: Making a label by using a database 7: Making a banner or sign with continuous length tape 8: Making sequential labels using the Numbering function 9: Using P-touch Editor to make a label that contains a bar code • Using / Connecting an Microsoft® Excel file • Specifying the label length or using auto setting • Inserting clip art illustrations • Specifying the field to increment (numbering field) • Printing • Selecting a protocol 10: Making address labels with continuous length tape • Using tape as vertical direction 11: Making a label by using the Auto Format feature 12: Making a label by using the P-touch Library • Using the Auto Format function • Using the P-touch Library Creating Labels (For Macintosh) Appendix 12 Creating Different Types of Labels
-
 1
1 -
2
-
3
-
4
-
5
-
6
-
 7
7 -
 8
8 -
 9
9 -
 10
10 -
 11
11 -
 12
12 -
 13
13 -
 14
14 -
 15
15 -
 16
16 -
 17
17 -
18
-
19
-
20
-
21
-
22
-
23
-
24
-
25
-
26
-
27
-
28
-
29
-
30
-
31
-
32
-
33
-
34
-
35
-
36
-
37
-
38
-
39
-
40
-
41
-
42
-
43
-
44
-
45
-
46
-
47
-
48
-
49
-
50
-
51
-
52
-
53
-
54
-
55
-
56
-
57
-
58
-
59
-
60
-
61
-
62
-
63
-
64
-
65
-
66
-
67
 |
 |
