Brother International ™ QL-1050 Software Users Manual - English - Page 36
Importing the Contact Data, Importing the contact data in CSV format
 |
View all Brother International ™ QL-1050 manuals
Add to My Manuals
Save this manual to your list of manuals |
Page 36 highlights
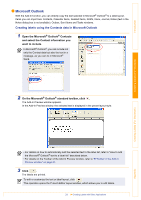
Introduction Creating Labels (For Windows) Importing the Contact Data The CSV format files and Outlook® Contacts data can be imported and used as P-touch Address Book contacts. Importing the contact data in CSV format 1 Click [File]-[Import]-[CSV File]. The [Open] dialog box appears. 2 Select a file to be imported and click . The [Stop Signal Replacement] dialog box appears. 3 Select [Original File Conversion Stop signal] and click . When the [Make Field Name the First] is checked, the first line shows the field names. The [Fields to Import] dialog box appears. 4 Assign [CSV/Outlook Fields] to [Address Book Fields] and click . Every CSV file field is imported, even if the same field is not included in the Address Book contact. The Contact data are displayed in Record View. Creating Labels (For Macintosh) Appendix 36 Importing the Contact Data
-
 1
1 -
2
-
3
-
4
-
5
-
6
-
7
-
8
-
9
-
10
-
11
-
12
-
13
-
14
-
15
-
16
-
17
-
18
-
19
-
20
-
21
-
22
-
23
-
24
-
25
-
26
-
27
-
28
-
29
-
30
-
 31
31 -
 32
32 -
 33
33 -
 34
34 -
 35
35 -
 36
36 -
 37
37 -
 38
38 -
 39
39 -
 40
40 -
 41
41 -
42
-
43
-
44
-
45
-
46
-
47
-
48
-
49
-
50
-
51
-
52
-
53
-
54
-
55
-
56
-
57
-
58
-
59
-
60
-
61
-
62
-
63
-
64
-
65
-
66
-
67
 |
 |
