Brother International ™ QL-1050 Software Users Manual - English - Page 28
How to add the Microsoft Word text to a label list, Click
 |
View all Brother International ™ QL-1050 manuals
Add to My Manuals
Save this manual to your list of manuals |
Page 28 highlights
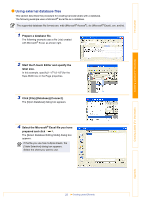
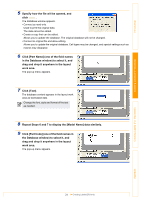
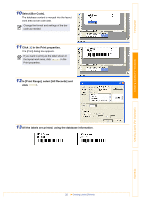
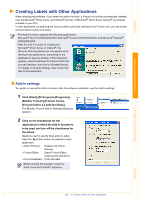
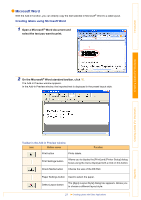
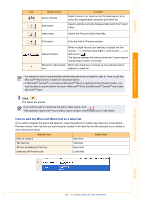
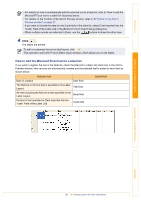
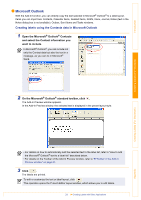
Introduction Creating Labels (For Windows) Icon Button name Function Zoom controls Used to zoom in or zoom out on the label layout, or to select the magnification using the pull-down list. Edit button Used to edit the currently displayed label with the P-touch Editor. Help button Opens the P-touch Editor Help files. Exit button Exits the Add-In Preview window. Record buttons When multiple records are selected, displays the first record ( ), previous record ( ), next record ( ), or last record ( ). The figures between the buttons show the "current record number/total number of records". Record in Label check When this check box is turned on, the selected text is box added to a label list. • For details on how to automatically add the selected text to a label list, refer to "How to add the Microsoft® Word text to a label list" described below. • If Microsoft® Outlook® is running and Microsoft® Word is selected as the standard editor, you won't be able to use the Add-In function in Microsoft® Word. Exit Microsoft® Outlook® and restart Microsoft® Word. 3 Click . The labels are printed. If you want to edit or customize the text or label layout, click . This operation opens the P-touch Editor layout window, which allows you to edit labels. How to add the Microsoft Word text to a label list If you want to register the text in the label list, check the [Record In Label List] check box in the Add-In Preview window. New records are automatically created in the label list and the selected text is added to each field shown below: Date of creation Selected text Date field Added field The first line All lines including the first line Detected ZIP/Postal code Title field Body field Code field Creating Labels (For Macintosh) Appendix 28 Creating Labels with Other Applications
-
 1
1 -
2
-
3
-
4
-
5
-
6
-
7
-
8
-
9
-
10
-
11
-
12
-
13
-
14
-
15
-
16
-
17
-
18
-
19
-
20
-
21
-
22
-
 23
23 -
 24
24 -
 25
25 -
 26
26 -
 27
27 -
 28
28 -
 29
29 -
 30
30 -
 31
31 -
 32
32 -
 33
33 -
34
-
35
-
36
-
37
-
38
-
39
-
40
-
41
-
42
-
43
-
44
-
45
-
46
-
47
-
48
-
49
-
50
-
51
-
52
-
53
-
54
-
55
-
56
-
57
-
58
-
59
-
60
-
61
-
62
-
63
-
64
-
65
-
66
-
67
 |
 |
