Brother International ™ QL-1050 Software Users Manual - English - Page 35
Creating a New Contact
 |
View all Brother International ™ QL-1050 manuals
Add to My Manuals
Save this manual to your list of manuals |
Page 35 highlights
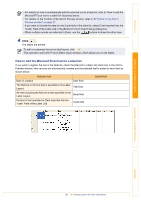
Introduction Creating a New Contact This section explains how to create a new contact. 1 Click [File]-[New Contact]. Or, click . The [New Contact] dialog box appears. 2 Enter data for each item. 1 2 Creating Labels (For Windows) Creating Labels (For Macintosh) 1 New Contact form toolbar The following commands are categorized in the menu: Icon Button name Function Previous Displays the previous contact. Next Displays the next contact. New Contact Displays the New Contact form window for a new contact. Delete Contact Deletes the contact that is currently selected. Image Allows you to insert an image for a contact. The following file types are supported: • Bitmap (*.bmp, *.dib) • JPEG file (*.jpg, *.jpeg) • TIFF file (uncompressed)(*.tif ) • GIF file (*.gif ) • Icon (*.ico) • Windows Meta File(*.wmf, *.emf)(*Image adjustment is not allowed.) • PNG file (*.png) Save and Close Saves the contact and closes the [New Contact] dialog box. 2 Contact form Used to enter each item such as name, address, phone number, company information, and E-mail for the new contact. 3 Click . 35 Creating a New Contact Appendix
-
 1
1 -
2
-
3
-
4
-
5
-
6
-
7
-
8
-
9
-
10
-
11
-
12
-
13
-
14
-
15
-
16
-
17
-
18
-
19
-
20
-
21
-
22
-
23
-
24
-
25
-
26
-
27
-
28
-
29
-
 30
30 -
 31
31 -
 32
32 -
 33
33 -
 34
34 -
 35
35 -
 36
36 -
 37
37 -
 38
38 -
 39
39 -
 40
40 -
41
-
42
-
43
-
44
-
45
-
46
-
47
-
48
-
49
-
50
-
51
-
52
-
53
-
54
-
55
-
56
-
57
-
58
-
59
-
60
-
61
-
62
-
63
-
64
-
65
-
66
-
67
 |
 |
