Brother International ™ QL-720NW Quick Setup Guide - English and Spa - Page 24
Peer Network Printer, Network Shared Printer
 |
View all Brother International ™ QL-720NW manuals
Add to My Manuals
Save this manual to your list of manuals |
Page 24 highlights
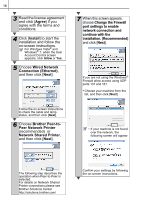
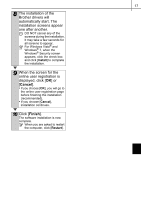
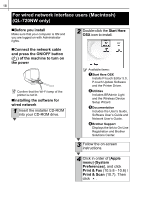
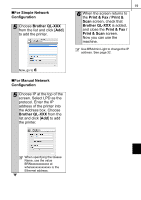
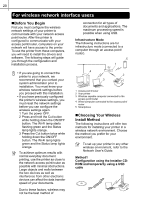
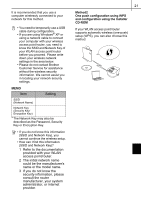
16 3 Read the license agreement and click [Agree] if you agree with the terms and conditions. 4 Click [Install] to start the installation and follow the on-screen instructions. For Windows Vista® and Windows® 7, when the User Account Control screen appears, click Allow or Yes. 5 Choose Wired Network Connection (Ethernet), and then click [Next]. 7 When this screen appears, choose Change the Firewall port settings to enable network connection and continue with the installation. (Recommended) and click [Next]. If you are not using the Windows® Firewall allow access using UDP ports 137 and 161. • Choose your machine from the list, and then click [Next]. Follow the on-screen instructions to check the cable and lamp status, and then click [Next]. 6 Choose Brother Peer-toPeer Network Printer (recommended) or Network Shared Printer, and then click [Next]. • If your machine is not found over the network, the following screen will appear. The following step describes the operation when Peer-to-Peer is selected. For details on Network Shared Printer connections please see Brother Solutions Center http://solutions.brother.com/ Confirm your settings by following the on-screen instructions.
-
 1
1 -
2
-
3
-
4
-
5
-
6
-
7
-
8
-
9
-
10
-
11
-
12
-
13
-
14
-
15
-
16
-
17
-
18
-
 19
19 -
 20
20 -
 21
21 -
 22
22 -
 23
23 -
 24
24 -
 25
25 -
 26
26 -
 27
27 -
 28
28 -
 29
29 -
30
-
31
-
32
-
33
-
34
-
35
-
36
-
37
-
38
-
39
-
40
-
41
-
42
-
43
-
44
-
45
-
46
-
47
-
48
-
49
-
50
-
51
-
52
-
53
-
54
-
55
-
56
-
57
-
58
-
59
-
60
-
61
-
62
-
63
-
64
-
65
-
66
-
67
-
68
-
69
-
70
-
71
-
72
-
73
-
74
-
75
-
76
-
77
-
78
-
79
-
80
-
81
-
82
-
83
-
84
-
85
-
86
-
87
-
88
-
89
-
90
-
91
-
92
-
93
 |
 |
