Brother International ™ QL-720NW Quick Setup Guide - English and Spa - Page 38
Network Key, Finish, For Method 2 users, WPS symbol.
 |
View all Brother International ™ QL-720NW manuals
Add to My Manuals
Save this manual to your list of manuals |
Page 38 highlights
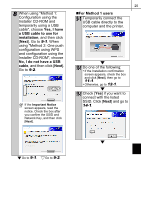
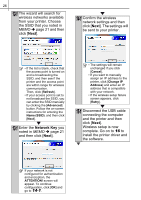
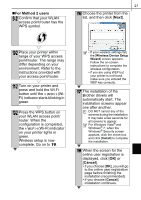
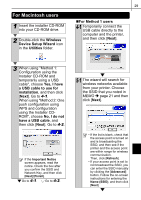
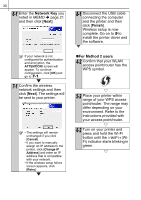
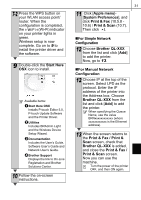
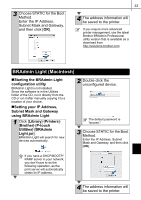
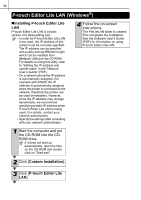
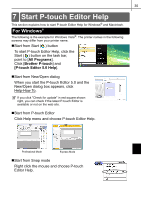
30 6-1 Enter the Network Key you noted in MEMO Î page 21 and then click [Next]. 8-1 Disconnect the USB cable connecting the computer and the printer and then click [Finish]. Wireless setup is now complete. Go on to 9 to install the printer driver and the software. If your network is not configured for authentication and encryption, the ATTENTION! screen will appear. To continue configuration, click [OK] and go to 7-1. 7-1 Confirm the wireless network settings and then click [Next]. The settings will be sent to your printer. • The settings will remain unchanged if you click [Cancel]. • If you want to manually assign an IP address to the printer, click [Change IP Address] and enter an IP address that is compatible with your network. • If the wireless setup failure screen appears, click [Retry]. „For Method 2 users 4-2 Confirm that your WLAN access point/router has the WPS symbol. 5-2 Place your printer within range of your WPS access point/router. The range may differ depending on your environment. Refer to the instructions provided with your access point/router. 6-2 Turn on your printer and press and hold the Wi-Fi button until the (Wi- Fi) indicator starts blinking in green.
-
 1
1 -
2
-
3
-
4
-
5
-
6
-
7
-
8
-
9
-
10
-
11
-
12
-
13
-
14
-
15
-
16
-
17
-
18
-
19
-
20
-
21
-
22
-
23
-
24
-
25
-
26
-
27
-
28
-
29
-
30
-
31
-
32
-
 33
33 -
 34
34 -
 35
35 -
 36
36 -
 37
37 -
 38
38 -
 39
39 -
 40
40 -
 41
41 -
 42
42 -
 43
43 -
44
-
45
-
46
-
47
-
48
-
49
-
50
-
51
-
52
-
53
-
54
-
55
-
56
-
57
-
58
-
59
-
60
-
61
-
62
-
63
-
64
-
65
-
66
-
67
-
68
-
69
-
70
-
71
-
72
-
73
-
74
-
75
-
76
-
77
-
78
-
79
-
80
-
81
-
82
-
83
-
84
-
85
-
86
-
87
-
88
-
89
-
90
-
91
-
92
-
93
 |
 |
