Brother International ™ QL-720NW Quick Setup Guide - English and Spa - Page 37
For Macintosh users, Wireless, Device Setup Wizard, Utilities, Yes, I have, a USB cable to use
 |
View all Brother International ™ QL-720NW manuals
Add to My Manuals
Save this manual to your list of manuals |
Page 37 highlights
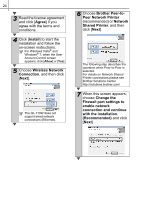
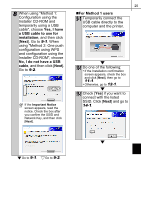
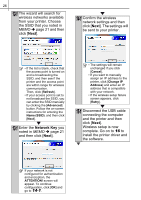
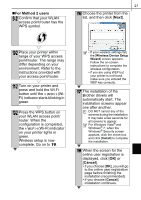
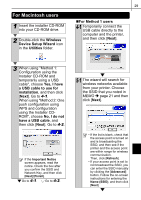
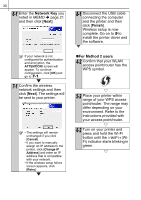
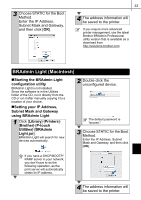
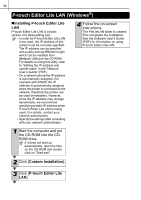
For Macintosh users 1 Insert the installer CD-ROM into your CD-ROM drive. 2 Double-click the Wireless Device Setup Wizard icon in the Utilities folder. 29 „For Method 1 users 4-1 Temporarily connect the USB cable directly to the computer and the printer, and then click [Next]. 3 When using "Method 1: Configuration using the Installer CD-ROM and temporarily using a USB cable", choose Yes, I have a USB cable to use for installation, and then click [Next]. Go to 4-1. When using "Method 2: One push configuration using WPS and configuration using the Installer CDROM", choose No, I do not have a USB cable, and then click [Next]. Go to 4-2. If the Important Notice screen appears, read the notice. Check the box after you confirm the SSID and Network Key, and then click [Next]/[Finish]. Go to 4-1. Go to 4-2. 5-1 The wizard will search for wireless networks available from your printer. Choose the SSID that you noted in MEMO Î page 21 and then click [Next]. • If the list is blank, check that the access point is turned on and is broadcasting the SSID, and then see if the printer and the access point are within range for wireless communication. Then, click [Refresh]. • If your access point is set to not broadcast the SSID, you can enter the SSID manually by clicking the [Advanced] button. Follow the on-screen instructions for entering the Name (SSID), and then click [Next].
-
 1
1 -
2
-
3
-
4
-
5
-
6
-
7
-
8
-
9
-
10
-
11
-
12
-
13
-
14
-
15
-
16
-
17
-
18
-
19
-
20
-
21
-
22
-
23
-
24
-
25
-
26
-
27
-
28
-
29
-
30
-
31
-
 32
32 -
 33
33 -
 34
34 -
 35
35 -
 36
36 -
 37
37 -
 38
38 -
 39
39 -
 40
40 -
 41
41 -
 42
42 -
43
-
44
-
45
-
46
-
47
-
48
-
49
-
50
-
51
-
52
-
53
-
54
-
55
-
56
-
57
-
58
-
59
-
60
-
61
-
62
-
63
-
64
-
65
-
66
-
67
-
68
-
69
-
70
-
71
-
72
-
73
-
74
-
75
-
76
-
77
-
78
-
79
-
80
-
81
-
82
-
83
-
84
-
85
-
86
-
87
-
88
-
89
-
90
-
91
-
92
-
93
 |
 |
