Brother International ™ QL-720NW Quick Setup Guide - English and Spa - Page 30
Now, go on to the installation procedure., For information about the Network Setting Tool
 |
View all Brother International ™ QL-720NW manuals
Add to My Manuals
Save this manual to your list of manuals |
Page 30 highlights
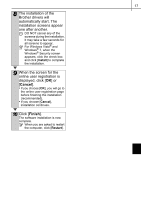
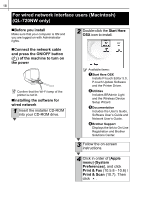
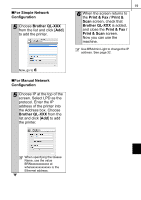
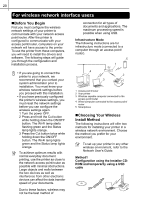
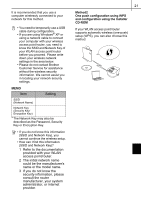
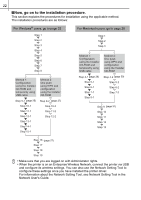
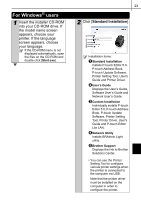
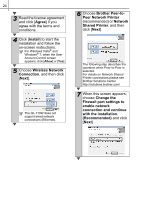
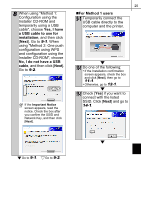
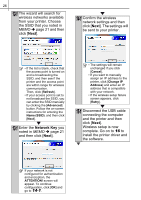
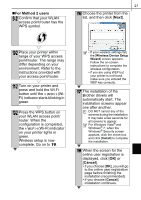
22 „Now, go on to the installation procedure. This section explains the procedures for installation using the applicable method. The installation procedures are as follows: For Windows® users, go to page 23 Step 1 Step 2 Step 3 Step 4 Step 5 Step 6 Step 7 Step 8 Method 1: Configuration using the Installer CD-ROM and temporarily using USB cable Method 2: One push using WPS and configuration using the Installer CD-ROM Step 9-1 (paggee.25) Step 10-1 Step 11-1 Step 12-1 Step 13-1 Step 14-1 Step 9-2 ((ppaagge.27)) Step 10-2 Step 11-2 Step 12-2 Step 15-1 For Macintosh users, go to page 29 Step 1 Step 2 Step 3 Method 1: Configuration using the Installer CD-ROM and temporarily using USB cable Method 2: One push using WPS and configuration using the Installer CD-ROM Step 4-1 ((ppaaggee2. 9) ) Step 5-1 Step 6-1 Step 7-1 Step 8-1 Step 4-2 ((ppaaggee.30)) Step 5-2 Step 6-2 Step 7-2 Step 9 ((ppaaggee.3X1X)) Step 10 Step 11 Step 12 Step 13 Step 16 ((ppaaggee.27)) Step 17 Step 18 Step 19 • Make sure that you are logged on with Administrator rights. • When the printer is on an Enterprise Wireless Network, connect the printer via USB and configure its wireless settings. You can also use the Network Setting Tool to configure these settings once you have installed the printer driver. For information about the Network Setting Tool, see Network Setting Tool in the Network User's Guide.
-
 1
1 -
2
-
3
-
4
-
5
-
6
-
7
-
8
-
9
-
10
-
11
-
12
-
13
-
14
-
15
-
16
-
17
-
18
-
19
-
20
-
21
-
22
-
23
-
24
-
 25
25 -
 26
26 -
 27
27 -
 28
28 -
 29
29 -
 30
30 -
 31
31 -
 32
32 -
 33
33 -
 34
34 -
 35
35 -
36
-
37
-
38
-
39
-
40
-
41
-
42
-
43
-
44
-
45
-
46
-
47
-
48
-
49
-
50
-
51
-
52
-
53
-
54
-
55
-
56
-
57
-
58
-
59
-
60
-
61
-
62
-
63
-
64
-
65
-
66
-
67
-
68
-
69
-
70
-
71
-
72
-
73
-
74
-
75
-
76
-
77
-
78
-
79
-
80
-
81
-
82
-
83
-
84
-
85
-
86
-
87
-
88
-
89
-
90
-
91
-
92
-
93
 |
 |
