Brother International ™ QL-720NW Quick Setup Guide - English and Spa - Page 34
Network Key, Disconnect the USB cable
 |
View all Brother International ™ QL-720NW manuals
Add to My Manuals
Save this manual to your list of manuals |
Page 34 highlights
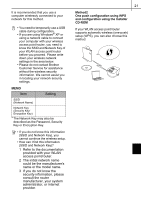
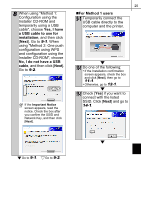
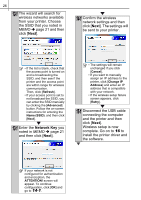
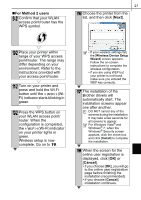
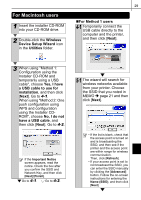
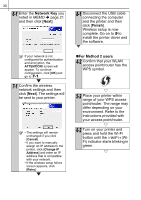
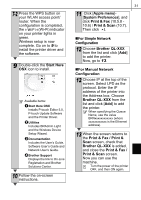
26 12-1 The wizard will search for wireless networks available from your printer. Choose the SSID that you noted in MEMO Î page 21 and then click [Next]. 14-1 Confirm the wireless network settings and then click [Next]. The settings will be sent to your printer. • If the list is blank, check that the access point is turned on and is broadcasting the SSID, and then see if the printer and the access point are within range for wireless communication. Then, click [Refresh]. • If your access point is set to not broadcast the SSID, you can enter the SSID manually by clicking the [Advanced] button. Follow the on-screen instructions for entering the Name (SSID), and then click [Next]. 13-1 Enter the Network Key you noted in MEMO Î page 21 and then click [Next]. • The settings will remain unchanged if you click [Cancel]. • If you want to manually assign an IP address to the printer, click [Change IP Address] and enter an IP address that is compatible with your network. • If the wireless setup failure screen appears, click [Retry]. 15-1 Disconnect the USB cable connecting the computer and the printer and then click [Next]. Wireless setup is now complete. Go on to 16 to install the printer driver and the software. If your network is not configured for authentication and encryption, the ATTENTION! screen will appear. To continue configuration, click [OK] and go to 14-1.
-
 1
1 -
2
-
3
-
4
-
5
-
6
-
7
-
8
-
9
-
10
-
11
-
12
-
13
-
14
-
15
-
16
-
17
-
18
-
19
-
20
-
21
-
22
-
23
-
24
-
25
-
26
-
27
-
28
-
 29
29 -
 30
30 -
 31
31 -
 32
32 -
 33
33 -
 34
34 -
 35
35 -
 36
36 -
 37
37 -
 38
38 -
 39
39 -
40
-
41
-
42
-
43
-
44
-
45
-
46
-
47
-
48
-
49
-
50
-
51
-
52
-
53
-
54
-
55
-
56
-
57
-
58
-
59
-
60
-
61
-
62
-
63
-
64
-
65
-
66
-
67
-
68
-
69
-
70
-
71
-
72
-
73
-
74
-
75
-
76
-
77
-
78
-
79
-
80
-
81
-
82
-
83
-
84
-
85
-
86
-
87
-
88
-
89
-
90
-
91
-
92
-
93
 |
 |
