Brother International BES-963 Instruction Manual - English - Page 156
Adjustment of Timing Between Needle and Rotary Hook
 |
View all Brother International BES-963 manuals
Add to My Manuals
Save this manual to your list of manuals |
Page 156 highlights
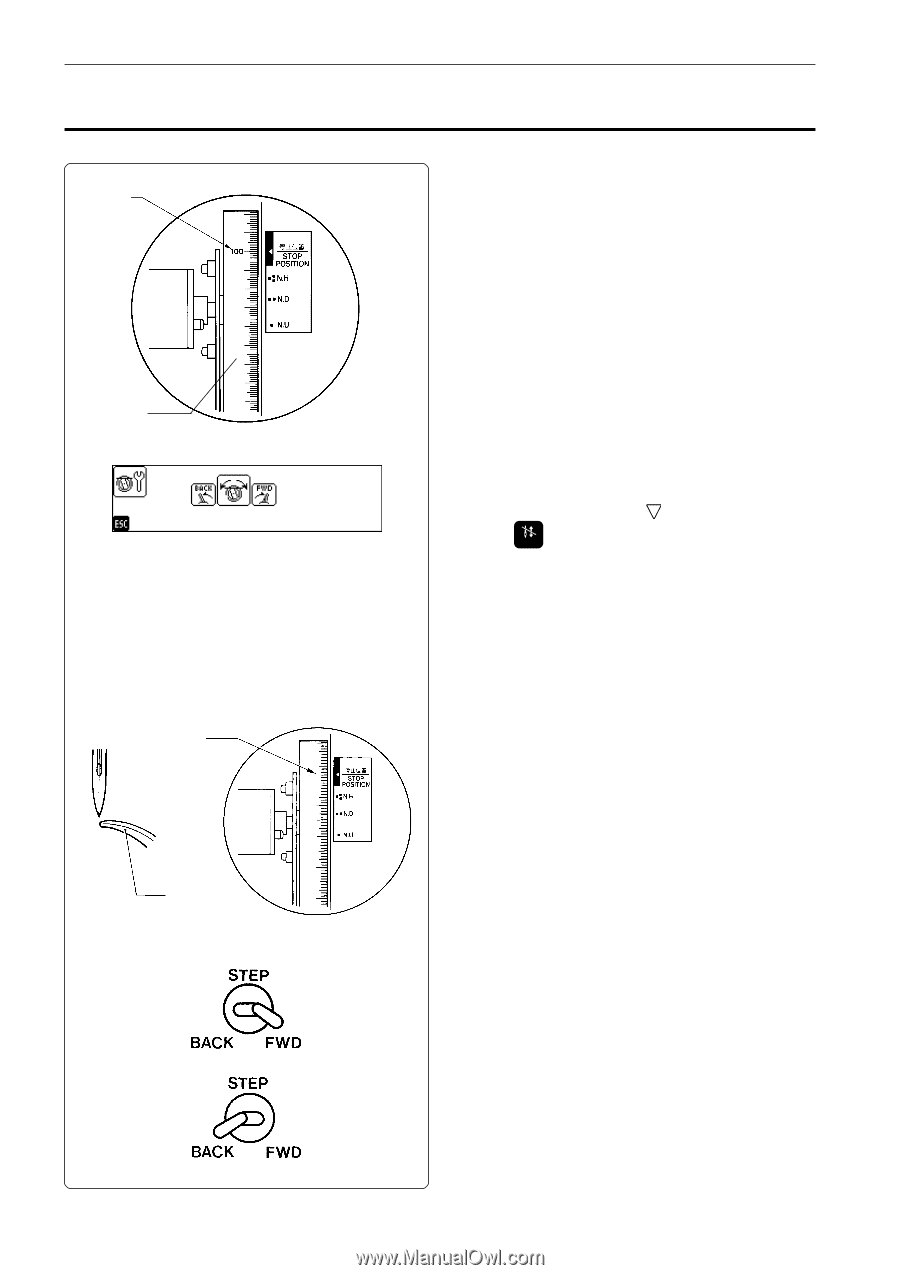
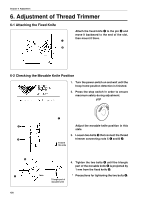
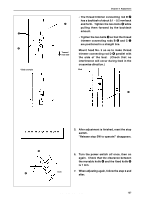
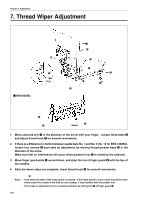
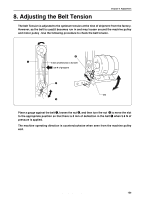
Chapter 8 Adjustment 4. Adjustment of Timing Between Needle and Rotary Hook 1. Turn the power switch on. 100˚ 2. Check that the machine pulley B q is at the stop position (at 100˚ of the scale). If not, turn the pulley B q until it comes to the stop position. q 3. While the machine is at the stop position (when the initial screen or halt screen is displayed), press the while holding down the . The rotary hook of each head STOP turns to a currently set alignment position for adjustment of the rotary hook. 140˚ 150 200 Rotary hook's point 4. Turn the pulley B q manually until the relationship between the needle point and the rotary hook's point can be easily checked (at around 140° of the scale). 5. Press the STEP BACK/FWD switch to move the rotary hook for each head to adjustment. • STEP BACK For rotating the rotary hook little by little in the clockwise direction • STEP FWD For rotating the rotary hook little by little in the counterclockwise direction Make this adjustment for each machine head so that the needle and the rotary hook's point can fit with each other. 154 BES-963BC • BES-1263BC
-
 1
1 -
2
-
3
-
4
-
5
-
6
-
7
-
8
-
9
-
10
-
11
-
12
-
13
-
14
-
15
-
16
-
17
-
18
-
19
-
20
-
21
-
22
-
23
-
24
-
25
-
26
-
27
-
28
-
29
-
30
-
31
-
32
-
33
-
34
-
35
-
36
-
37
-
38
-
39
-
40
-
41
-
42
-
43
-
44
-
45
-
46
-
47
-
48
-
49
-
50
-
51
-
52
-
53
-
54
-
55
-
56
-
57
-
58
-
59
-
60
-
61
-
62
-
63
-
64
-
65
-
66
-
67
-
68
-
69
-
70
-
71
-
72
-
73
-
74
-
75
-
76
-
77
-
78
-
79
-
80
-
81
-
82
-
83
-
84
-
85
-
86
-
87
-
88
-
89
-
90
-
91
-
92
-
93
-
94
-
95
-
96
-
97
-
98
-
99
-
100
-
101
-
102
-
103
-
104
-
105
-
106
-
107
-
108
-
109
-
110
-
111
-
112
-
113
-
114
-
115
-
116
-
117
-
118
-
119
-
120
-
121
-
122
-
123
-
124
-
125
-
126
-
127
-
128
-
129
-
130
-
131
-
132
-
133
-
134
-
135
-
136
-
137
-
138
-
139
-
140
-
141
-
142
-
143
-
144
-
145
-
146
-
147
-
148
-
149
-
150
-
 151
151 -
 152
152 -
 153
153 -
 154
154 -
 155
155 -
 156
156 -
 157
157 -
 158
158 -
 159
159 -
 160
160 -
 161
161 -
162
-
163
-
164
-
165
-
166
-
167
-
168
-
169
-
170
-
171
-
172
-
173
-
174
-
175
-
176
-
177
-
178
-
179
-
180
-
181
-
182
-
183
-
184
 |
 |