Brother International CE-5500/CE-5500PRW Operation Manual - Page 13
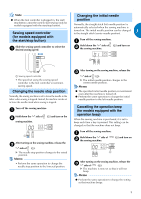
button to wind the thread around the bobbin
 |
View all Brother International CE-5500/CE-5500PRW manuals
Add to My Manuals
Save this manual to your list of manuals |
Page 13 highlights
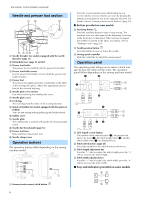
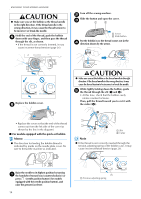
Pass the thread as illustrated bellow. c a Thread guide Note ● Make sure that the thread is pulled as far as possible into the pretension disk, otherwise the bobbin may not be wound cleanly. 1 Put the bobbin onto the bobbin winder shaft and d slide the bobbin winder shaft to the right. Turn the bobbin clockwise, by hand, until the spring on the shaft slides into the notch in the bobbin. • Make sure to pull out 7 to 10 cm (3 to 4 inches) of thread from the hole on the bobbin. b Thread guide cover c Bobbin-winding thread guide Make sure that the thread passes under the pretension disk. a Spring on the shaft b Notch c 7-10 cm (3 to 4 inches) CAUTION ● Pull the thread taut and hold the end of the thread straight up. If the thread is too short, not pulled taut or held at an angle, injuries may occur when the thread is wound around the bobbin. Turn on the sewing machine. e While holding the end of the thread, gently f press the foot controller or press (start/stop button) (for models equipped with the start/stop button) to wind the thread around the bobbin a few times. Then stop the machine and trim the excess thread. Note ● If the sewing machine is to be operated using the foot controller, connect the foot controller before turning on the machine. ● When the foot controller is plugged in, the start/ stop button cannot be used to start sewing (only for models equipped with the start/stop button). d Hook e Pretension disk f Pull it in as far as possible. a 1 cm (3/8 inch) 11
-
 1
1 -
2
-
3
-
4
-
5
-
6
-
7
-
 8
8 -
 9
9 -
 10
10 -
 11
11 -
 12
12 -
 13
13 -
 14
14 -
 15
15 -
 16
16 -
 17
17 -
 18
18 -
19
-
20
-
21
-
22
-
23
-
24
-
25
-
26
-
27
-
28
-
29
-
30
-
31
-
32
-
33
-
34
-
35
-
36
-
37
-
38
-
39
-
40
-
41
-
42
-
43
-
44
-
45
-
46
-
47
-
48
-
49
-
50
-
51
-
52
-
53
-
54
-
55
-
56
-
57
-
58
-
59
-
60
-
61
-
62
-
63
-
64
-
65
-
66
-
67
-
68
-
69
-
70
-
71
-
72
 |
 |
