Brother International CE-5500/CE-5500PRW Operation Manual - Page 60
Troubleshooting
 |
View all Brother International CE-5500/CE-5500PRW manuals
Add to My Manuals
Save this manual to your list of manuals |
Page 60 highlights
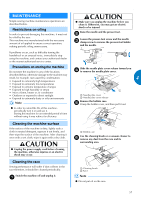
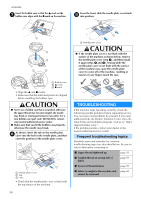
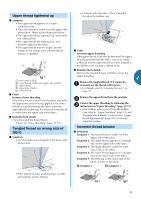
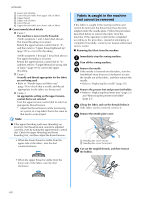
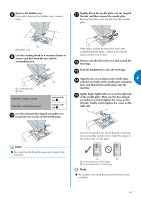
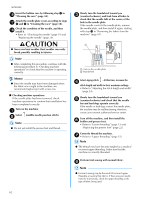
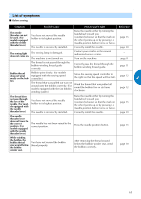
APPENDIX Insert the bobbin case so that the mark on the g bobbin case aligns with the ● mark on the machine. From the front, slide the needle plate cover back i into position. a Bobbin case b mark c ● mark • Align the and ● marks. • Make sure that the indicated points are aligned before installing the bobbin case. CAUTION ● Never use a bobbin case that is scratched, otherwise the upper thread may become tangled, the needle may break or sewing performance may suffer. For a new bobbin case (part code: XE7560-001), contact your nearest authorized service center. ● Make sure that you fit the bobbin case properly, otherwise the needle may break. As shown, insert the tab on the needle plate h cover into the hole in the needle plate, and then correctly position of the needle plate cover. a Needle plate cover b Tab c Hole • Check that the needle plate cover is flush with the top surface of the machine. 58 a Needle plate cover CAUTION ● If the needle plate cover is not flush with the surface of the machine as shown below, remove the needle plate cover (step d), and then install it again (steps h and i). Sewing while the needle plate cover is not flush with the surface of the machine may cause the needle plate cover to come off of the machine, resulting in injuries if your fingers touch the race. TROUBLESHOOTING If the machine stops operating correctly, check the following possible problems before requesting service. You can solve most problems by yourself. If you need additional help, the Brother Solutions Center offers the latest FAQs and troubleshooting tips. Visit us at " http:// support.brother.com/ " . If the problem persists, contact your dealer or the nearest authorized service center. Frequent troubleshooting topics Detailed causes and remedies for common troubleshooting topics are described below. Be sure to refer to this before contacting us. ■ Upper thread tightened up page 59 ■ Tangled thread on wrong side of fabric page 59 ■ Incorrect thread tension page 59 ■ Fabric is caught in the machine and page 60 cannot be removed
-
 1
1 -
2
-
3
-
4
-
5
-
6
-
7
-
8
-
9
-
10
-
11
-
12
-
13
-
14
-
15
-
16
-
17
-
18
-
19
-
20
-
21
-
22
-
23
-
24
-
25
-
26
-
27
-
28
-
29
-
30
-
31
-
32
-
33
-
34
-
35
-
36
-
37
-
38
-
39
-
40
-
41
-
42
-
43
-
44
-
45
-
46
-
47
-
48
-
49
-
50
-
51
-
52
-
53
-
54
-
 55
55 -
 56
56 -
 57
57 -
 58
58 -
 59
59 -
 60
60 -
 61
61 -
 62
62 -
 63
63 -
 64
64 -
 65
65 -
66
-
67
-
68
-
69
-
70
-
71
-
72
 |
 |
