Brother International CE-5500/CE-5500PRW Operation Manual - Page 62
Fabric is caught in the machine, and cannot be removed
 |
View all Brother International CE-5500/CE-5500PRW manuals
Add to My Manuals
Save this manual to your list of manuals |
Page 62 highlights
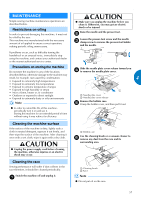
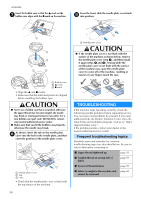
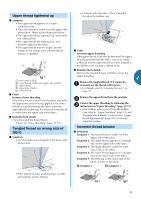
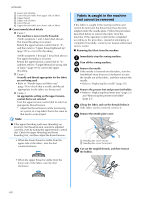
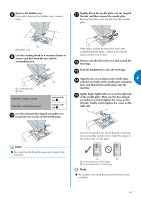
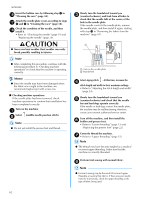
APPENDIX a Lower side of fabric b Lower thread visible from upper side of fabric c Upper thread d Upper side of fabric e Lower thread f Upper thread visible from lower side of fabric ■ Cause/remedy/check details Cause 1 The machine is not correctly threaded. The lower threading is incorrect. Return the upper tension-control dial to "4", and then refer to "Upper thread tightened up" (page 59) to correct the threading. The upper threading is incorrect. Return the upper tension-control dial to "4", and then refer to "Tangled thread on wrong side of fabric" (page 59) to correct the upper threading. Cause 2 A needle and thread appropriate for the fabric are not being used. • Refer to "Needle types and their uses" (page 19) to check that a needle and thread appropriate for the fabric are being used. Cause 3 An appropriate setting on the upper tensioncontrol dial is not selected. Turn the upper tension-control dial to select an appropriate thread tension. * Adjust the thread tension while test sewing on a piece of scrap fabric that is the same as that used in your project. Note ● If the upper threading and lower threading are incorrect, the thread tension cannot be adjusted correctly, even by turning the upper tension-control dial. Check the upper threading and lower threading first, and then adjust the thread tension. • When the lower thread is visible from the upper side of the fabric, turn the dial counterclockwise. 54 3 • When the upper thread is visible from the lower side of the fabric, turn the dial clockwise. Fabric is caught in the machine and cannot be removed If the fabric is caught in the sewing machine and cannot be removed, the thread may have become tangled under the needle plate. Follow the procedure described below to remove the fabric from the machine. If the operation could not be completed according to the procedure, instead of attempting to complete it forcefully, contact your nearest authorized service center. ■ Removing the fabric from the machine Immediately stop the sewing machine. a Turn off the sewing machine. b Remove the needle. c If the needle is lowered into the fabric, turn the handwheel away from you (clockwise) to raise the needle out of the fabric, and then remove the needle. • Refer to "Replacing the needle" (page 20). Remove the presser foot and presser foot holder. d • Refer to "Replacing the presser foot" (page 22) and "Removing the presser foot holder" (page 23). Lift up the fabric and cut the threads below it. e If the fabric can be removed, remove it. Remove the needle plate cover. f a Needle plate cover release b Needle plate cover (front part) Cut out the tangled threads, and then remove g the bobbin. 54 3 60
-
 1
1 -
2
-
3
-
4
-
5
-
6
-
7
-
8
-
9
-
10
-
11
-
12
-
13
-
14
-
15
-
16
-
17
-
18
-
19
-
20
-
21
-
22
-
23
-
24
-
25
-
26
-
27
-
28
-
29
-
30
-
31
-
32
-
33
-
34
-
35
-
36
-
37
-
38
-
39
-
40
-
41
-
42
-
43
-
44
-
45
-
46
-
47
-
48
-
49
-
50
-
51
-
52
-
53
-
54
-
55
-
56
-
 57
57 -
 58
58 -
 59
59 -
 60
60 -
 61
61 -
 62
62 -
 63
63 -
 64
64 -
 65
65 -
 66
66 -
 67
67 -
68
-
69
-
70
-
71
-
72
 |
 |
