Brother International CE-5500/CE-5500PRW Operation Manual - Page 61
Upper thread tightened up, Tangled thread on wrong side of, fabric, Incorrect thread tension
 |
View all Brother International CE-5500/CE-5500PRW manuals
Add to My Manuals
Save this manual to your list of manuals |
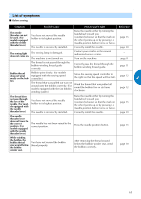
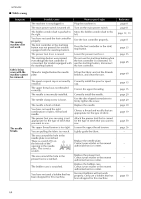
Page 61 highlights
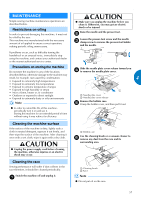
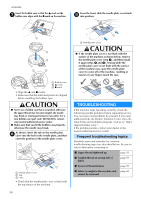
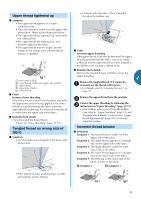
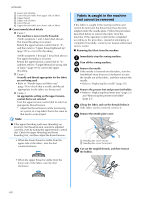
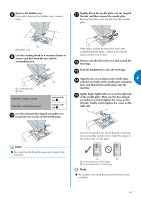
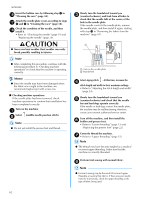
Upper thread tightened up ■ Symptom • The upper thread appears as a single continuous line. • The lower thread is visible from the upper side of the fabric. (Refer to the illustration below.) • The upper thread has tightened up, and comes out when pulled. • The upper thread has tightened up, and wrinkles appear in the fabric. • The upper thread tension is tight, and the results do not change even after the thread tension is adjusted. a Lower side of fabric b Lower thread visible from upper side of fabric c Upper thread d Upper side of fabric e Lower thread ■ Cause Incorrect lower threading If the lower thread is incorrectly threaded, instead of the appropriate tension being applied to the lower thread, it is pulled through the fabric when the upper thread is pulled up. For this reason, the thread is visible from the upper side of the fabric. ■ Remedy/check details Correctly install the lower thread. • Refer to "Lower threading" (page 13-15). Tangled thread on wrong side of fabric ■ Symptom • The thread becomes tangled on the lower side of the fabric. • After starting sewing, a rattling noise is made and sewing cannot continue. • Looking under the fabric, there is tangled thread in the bobbin case. ■ Cause Incorrect upper threading If the upper thread is incorrectly threaded, the upper thread passed through the fabric cannot be firmly pulled up and the upper thread becomes tangled in the bobbin case, causing a rattling noise. ■ Remedy/check details Remove the tangled thread, and then correct the upper threading. 4 Remove the tangled thread. If it cannot be a removed, cut the thread with scissors. • For details, refer to "Cleaning the race" on page 57. Remove the upper thread from the machine. b Correct the upper threading by following the c instructions in "Upper threading" (page 15-17). • If the bobbin was removed from the bobbin case, refer to "Lower threading" (page 13) and "Remedy/check details" in the section "Upper thread tightened up" (page 59) to correctly install the bobbin. Incorrect thread tension ■ Symptoms Symptom 1: The lower thread is visible from the upper side of the fabric. Symptom 2: The upper thread appears as a straight line on the upper side of the fabric. Symptom 3: The upper thread is visible from the lower side of the fabric. Symptom 4: The lower thread appears as a straight line on the lower side of the fabric. Symptom 5: The stitching on the lower side of the fabric is loose or has slack. Symptom 1 Symptom 3 59
-
 1
1 -
2
-
3
-
4
-
5
-
6
-
7
-
8
-
9
-
10
-
11
-
12
-
13
-
14
-
15
-
16
-
17
-
18
-
19
-
20
-
21
-
22
-
23
-
24
-
25
-
26
-
27
-
28
-
29
-
30
-
31
-
32
-
33
-
34
-
35
-
36
-
37
-
38
-
39
-
40
-
41
-
42
-
43
-
44
-
45
-
46
-
47
-
48
-
49
-
50
-
51
-
52
-
53
-
54
-
55
-
 56
56 -
 57
57 -
 58
58 -
 59
59 -
 60
60 -
 61
61 -
 62
62 -
 63
63 -
 64
64 -
 65
65 -
 66
66 -
67
-
68
-
69
-
70
-
71
-
72
 |
 |
