Brother International CE-5500/CE-5500PRW Operation Manual - Page 15
Lower threading
 |
View all Brother International CE-5500/CE-5500PRW manuals
Add to My Manuals
Save this manual to your list of manuals |
Page 15 highlights
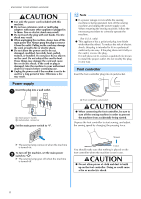
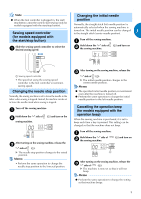
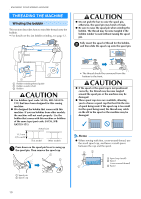
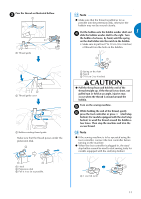
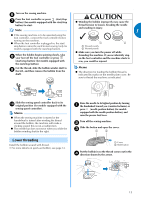
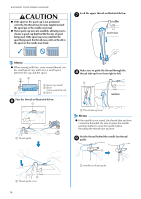
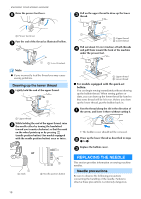
Turn on the sewing machine. f Press the foot controller or press (start/stop g button) (for models equipped with the start/stop button) to start. Note ● If the sewing machine is to be operated using the foot controller, connect the foot controller before turning on the machine. ● When the foot controller is plugged in, the start/ stop button cannot be used to start sewing (only for models equipped with the start/stop button). When the bobbin begins spinning slowly, take h your foot off the foot controller or press (start/stop button) (for models equipped with the start/stop button). Cut the thread, slide the bobbin winder shaft to i the left, and then remove the bobbin from the shaft. CAUTION ● Winding the bobbin improperly may cause the thread tension to loosen, breaking the needle and resulting in injury. 1 a Wound evenly b Wound poorly ● Make sure you turn the power off while threading the machine. If you accidentally step on the foot controller and the machine starts to sew, you could be injured. Memo ● The direction for feeding the bobbin thread is indicated by marks on the needle plate cover. Be sure to thread the machine as indicated. Slide the sewing speed controller back to its j original position (for models equipped with the sewing speed controller). Memo ● When the sewing machine is started or the handwheel is turned after winding the thread around the bobbin, the machine will make a clicking sound; this is not a malfunction. ● The needle bar does not move when you slide the bobbin winding shaft to the right. Raise the needle to its highest position by turning a the handwheel toward you (counterclockwise) or press (needle position button) (for models equipped with the needle position button), and raise the presser foot lever. Turn off the sewing machine. b Slide the button and open the cover. c 1 2 Lower threading Install the bobbin wound with thread. • For more details on quick-set bobbin, see page 14. a Cover b Slide button Put the bobbin in so the thread comes out in the d direction shown by the arrow. 13
-
 1
1 -
2
-
3
-
4
-
5
-
6
-
7
-
8
-
9
-
 10
10 -
 11
11 -
 12
12 -
 13
13 -
 14
14 -
 15
15 -
 16
16 -
 17
17 -
 18
18 -
 19
19 -
 20
20 -
21
-
22
-
23
-
24
-
25
-
26
-
27
-
28
-
29
-
30
-
31
-
32
-
33
-
34
-
35
-
36
-
37
-
38
-
39
-
40
-
41
-
42
-
43
-
44
-
45
-
46
-
47
-
48
-
49
-
50
-
51
-
52
-
53
-
54
-
55
-
56
-
57
-
58
-
59
-
60
-
61
-
62
-
63
-
64
-
65
-
66
-
67
-
68
-
69
-
70
-
71
-
72
 |
 |
