Brother International CE-5500/CE-5500PRW Operation Manual - Page 30
Sewing hook-and-loop fastener, Sewing thin fabrics, Sewing stretch fabrics, Stitching cylindrical
 |
View all Brother International CE-5500/CE-5500PRW manuals
Add to My Manuals
Save this manual to your list of manuals |
Page 30 highlights
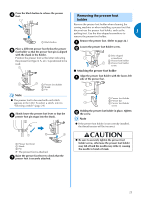
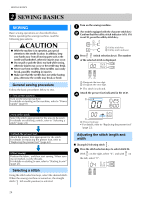
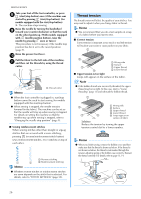
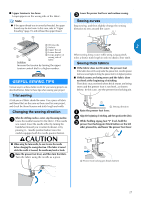
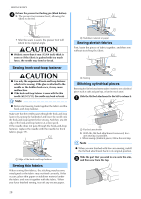
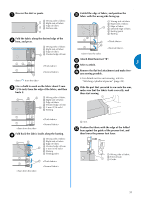
SEWING BASICS Release the presser foot locking pin (black button). d The presser foot remains level, allowing the fabric to be fed. • After the seam is sewn, the presser foot will return to its original angle. CAUTION ● If fabric more than 6 mm (15/64 inch) thick is sewn or if the fabric is pushed with too much force, the needle may bend or break. Sewing hook-and-loop fastener CAUTION ● Use only the ungummed hook-and-loop fastener which is for sewing. If the glue is attached to the needle or the bobbin hook race, it may cause malfunction. ● If the hook-and-loop fastener is sewn with the thin needle (65/9-75/11), the needle may bend or break. Note ● Before start sewing, baste together the fabric and the hook-and-loop fastener. Make sure that the needle passes through the hook-and-loop fastener by turning the handwheel and lower the needle into the hook-and-loop fastener before sewing. And then, sew the edge of the hook-and-loop fastener at a slow speed. If the needle does not pass through the hook-and-loop fastener, replace the needle with the needle for thick fabrics (page 19). a Edge of the hook-and-loop fastener Sewing thin fabrics When sewing thin fabrics, the stitching may become misaligned or the fabric may not feed correctly. If this occurs, place thin paper or stabilizer material under the fabric and sew it together with the fabric. When you have finished sewing, tear off any excess paper. a Stabilizer material or paper Sewing stretch fabrics First, baste the pieces of fabric together, and then sew without stretching the fabric. a Basting Stitching cylindrical pieces Removing the flat bed attachment makes it easier to sew cylindrical pieces such as cuffs and pant legs, or hard-to-reach areas. Slide the flat bed attachment to the left to release it. a a Flat bed attachment With the flat bed attachment removed, freearm sewing is possible. • When sewing cylindrical pieces, follow the next step. Note ● When you are finished with free-arm sewing, install the flat bed attachment back in its original position. Slide the part that you wish to sew onto the arm, b and then sew from the top. 28
-
 1
1 -
2
-
3
-
4
-
5
-
6
-
7
-
8
-
9
-
10
-
11
-
12
-
13
-
14
-
15
-
16
-
17
-
18
-
19
-
20
-
21
-
22
-
23
-
24
-
 25
25 -
 26
26 -
 27
27 -
 28
28 -
 29
29 -
 30
30 -
 31
31 -
 32
32 -
 33
33 -
 34
34 -
 35
35 -
36
-
37
-
38
-
39
-
40
-
41
-
42
-
43
-
44
-
45
-
46
-
47
-
48
-
49
-
50
-
51
-
52
-
53
-
54
-
55
-
56
-
57
-
58
-
59
-
60
-
61
-
62
-
63
-
64
-
65
-
66
-
67
-
68
-
69
-
70
-
71
-
72
 |
 |
