Brother International CE-5500/CE-5500PRW Operation Manual - Page 34
Buttonhole Sewing
 |
View all Brother International CE-5500/CE-5500PRW manuals
Add to My Manuals
Save this manual to your list of manuals |
Page 34 highlights
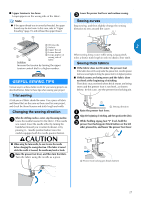
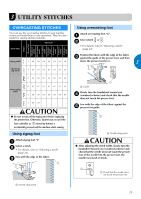
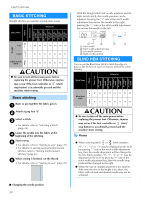
UTILITY STITCHES Adjust the stitch width until the needle slightly k catches the fold of the hem. a Needle drop point When you change the needle drop point, raise the needle, and then change the stitch width. Stitch width a Wrong side of fabric b Right side of fabric • For details on changing the stitch width, refer to "Selecting a stitch" (page 24). Sew with the fold of the hem against the presser l foot guide. Remove the basting stitching and turn the fabric m right side up. a Thick fabric b Normal fabric ■ If the needle catches too much of the hem fold If the needle catches too much of the hem fold, adjust the stitch width so that the needle slightly catches the fold by pressing the "+" side of the stitch width adjustment key. a Wrong side of fabric b Right side of fabric BUTTONHOLE SEWING Buttonholes can be sewn and buttons can be sewn on. Pattern No. Stitch Name Pattern Presser Foot 100 stitches model 80/90 stitches model 60/70 stitches model 50 stitches model 40 stitches model 30 stitches model 20 stitches model a Wrong side of fabric b Right side of fabric ■ If the needle does not catch the hem fold If the needle does not catch the hem fold, adjust the stitch width so that the needle slightly catches the fold by pressing the "-" side of the stitch width adjustment key. Buttonhole stitch Zigzag stitch (for quilting) A 34 34 29 29 25 21 16 A 35 35 30 30 26 22 17 A 36 36 31 31 27 - A 37 37 32 32 28 - A 38 38 - - - - A 39 39 33 33 29 23 18 A 40 40 34 - - - A 41 41 35 - - - J 46 46 40 - - - - 32
-
 1
1 -
2
-
3
-
4
-
5
-
6
-
7
-
8
-
9
-
10
-
11
-
12
-
13
-
14
-
15
-
16
-
17
-
18
-
19
-
20
-
21
-
22
-
23
-
24
-
25
-
26
-
27
-
28
-
 29
29 -
 30
30 -
 31
31 -
 32
32 -
 33
33 -
 34
34 -
 35
35 -
 36
36 -
 37
37 -
 38
38 -
 39
39 -
40
-
41
-
42
-
43
-
44
-
45
-
46
-
47
-
48
-
49
-
50
-
51
-
52
-
53
-
54
-
55
-
56
-
57
-
58
-
59
-
60
-
61
-
62
-
63
-
64
-
65
-
66
-
67
-
68
-
69
-
70
-
71
-
72
 |
 |
