Brother International CE-5500/CE-5500PRW Operation Manual - Page 35
the presser foot.
 |
View all Brother International CE-5500/CE-5500PRW manuals
Add to My Manuals
Save this manual to your list of manuals |
Page 35 highlights
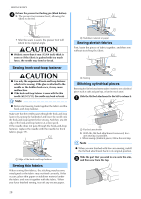
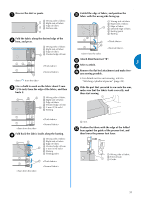
A A CAUTION ● Be sure to turn off the main power before replacing the presser foot. Otherwise, injuries may occur if the foot controller or (start/ stop button) is accidentally pressed and the machine starts sewing. The maximum buttonhole length is about 28 mm (1-1/ 8 inches) (diameter + thickness of the button). Buttonholes are sewn from the front of the presser foot to the back, as shown below. Pull out the button guide plate of buttonhole b foot "A", and then insert the button that will be put through the buttonhole. The size of the buttonhole is set. ■ If the button does not fit in the button guide plate Add together the diameter and thickness of the button, and then set the button guide plate to the calculated length. (The distance between 3 the markings on the presser foot scale is 5 mm (3/16 inch).) a Reinforcement stitching ■ Part names of the buttonhole foot "A" a Button guide plate b Presser foot scale c Pin d Marks on buttonhole foot e 5 mm (3/16 inch) Use chalk to mark the position and length of the a buttonhole on the fabric. a Presser foot scale b Length of buttonhole (Diameter + thickness of button) c 5 mm (3/16 inch) Example: For a button with a diameter of 15 mm (9/ 16 inch) and a thickness of 10 mm (3/8 inch), the button guide plate should be set to 25 mm (1 inch) on the scale. 4 d 10 mm (3/8 inch) 5 e 15 mm (9/16 inch) Attach buttonhole foot "A". c Select a stitch. d Pass the upper thread down through the hole in e the presser foot. a Marks on fabric b Buttonhole sewing 33
-
 1
1 -
2
-
3
-
4
-
5
-
6
-
7
-
8
-
9
-
10
-
11
-
12
-
13
-
14
-
15
-
16
-
17
-
18
-
19
-
20
-
21
-
22
-
23
-
24
-
25
-
26
-
27
-
28
-
29
-
 30
30 -
 31
31 -
 32
32 -
 33
33 -
 34
34 -
 35
35 -
 36
36 -
 37
37 -
 38
38 -
 39
39 -
 40
40 -
41
-
42
-
43
-
44
-
45
-
46
-
47
-
48
-
49
-
50
-
51
-
52
-
53
-
54
-
55
-
56
-
57
-
58
-
59
-
60
-
61
-
62
-
63
-
64
-
65
-
66
-
67
-
68
-
69
-
70
-
71
-
72
 |
 |
