Brother International CE-5500/CE-5500PRW Operation Manual - Page 31
Utility Stitches
 |
View all Brother International CE-5500/CE-5500PRW manuals
Add to My Manuals
Save this manual to your list of manuals |
Page 31 highlights
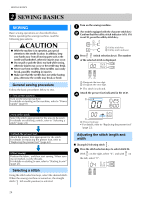
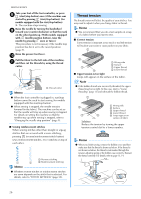
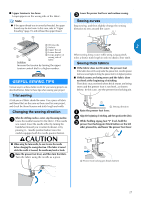
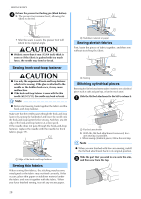
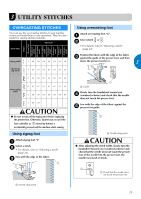
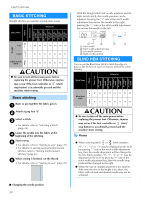
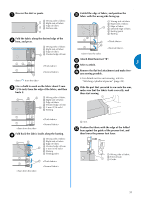
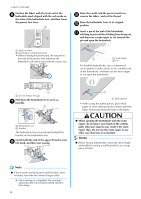
3 UTILITY STITCHES Pattern Presser Foot 100 stitches model 80/90 stitches model 60/70 stitches model 50 stitches model 40 stitches model 30 stitches model 20 stitches model OVERCASTING STITCHES You can use the overcasting stitches to join together seams and finish them in one operation. They are also useful for sewing stretch materials. Pattern No. Stitch Name Zigzag stitch 3-point zigzag stitch J 04 04 04 04 04 04 04 J 05 05 05 05 05 05 05 G 06 06 06 06 06 06 06 Overcasting stitch G 07 07 07 07 07 07 07 J 08 08 08 08 08 08 08 J 09 09 - - - - - CAUTION ● Be sure to turn off the main power before replacing the presser foot. Otherwise, injuries may occur if the foot controller or (start/stop button) is accidentally pressed and the machine starts sewing. Using zigzag foot Attach zigzag foot "J". a Select a stitch. b • For details, refer to "Selecting a stitch" (page 24). Sew with the edge of the fabric. c Using overcasting foot Attach overcasting foot "G". a Select stitch or . b • For details, refer to "Selecting a stitch" (page 24). Position the fabric with the edge of the fabric c against the guide of the presser foot, and then lower the presser foot lever. 3 a Guide Slowly turn the handwheel toward you d (counterclockwise) and check that the needle does not touch the presser foot. Sew with the edge of the fabric against the e presser foot guide. 1 a Needle drop point CAUTION ● After adjusting the stitch width, slowly turn the handwheel toward you (counterclockwise) and check that the needle does not touch the presser foot. If the needle hits the presser foot, the needle may bend or break. a Needle drop point a Check that the needle does not touch the presser foot. 29
-
 1
1 -
2
-
3
-
4
-
5
-
6
-
7
-
8
-
9
-
10
-
11
-
12
-
13
-
14
-
15
-
16
-
17
-
18
-
19
-
20
-
21
-
22
-
23
-
24
-
25
-
 26
26 -
 27
27 -
 28
28 -
 29
29 -
 30
30 -
 31
31 -
 32
32 -
 33
33 -
 34
34 -
 35
35 -
 36
36 -
37
-
38
-
39
-
40
-
41
-
42
-
43
-
44
-
45
-
46
-
47
-
48
-
49
-
50
-
51
-
52
-
53
-
54
-
55
-
56
-
57
-
58
-
59
-
60
-
61
-
62
-
63
-
64
-
65
-
66
-
67
-
68
-
69
-
70
-
71
-
72
 |
 |
