Brother International CE-5500/CE-5500PRW Operation Manual - Page 8
Needle and presser foot Operation buttons, Operation panel
 |
View all Brother International CE-5500/CE-5500PRW manuals
Add to My Manuals
Save this manual to your list of manuals |
Page 8 highlights
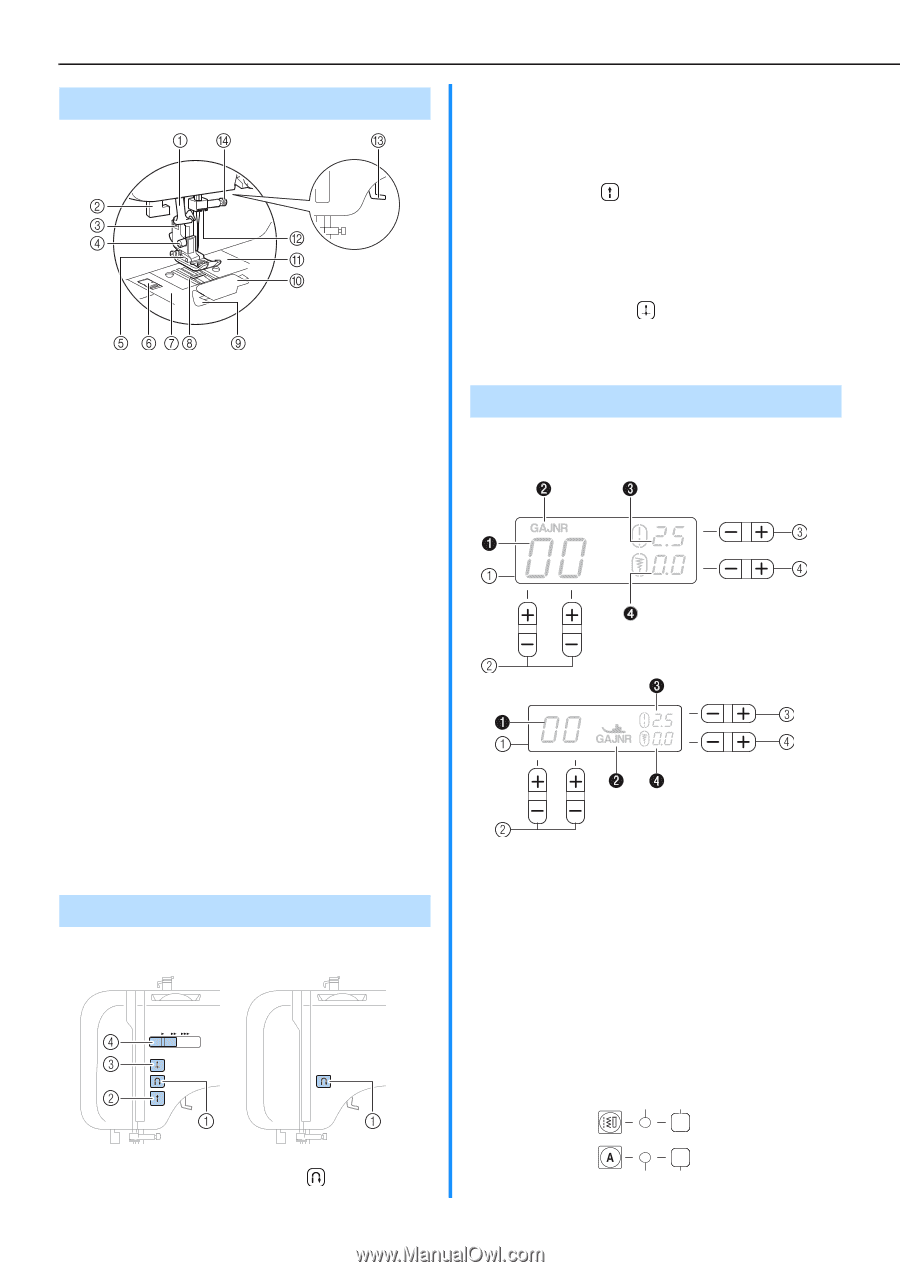
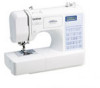
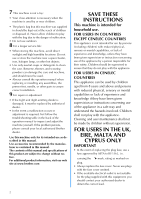
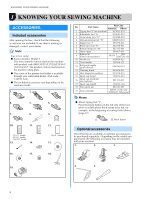
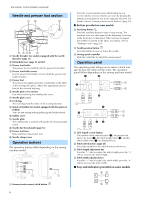
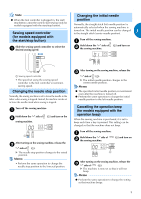
KNOWING YOUR SEWING MACHINE Needle and presser foot section a Needle threader (for models equipped with the needle threader) (page 17) b Buttonhole lever (page 34 and 42) c Presser foot holder The presser foot is installed onto the presser foot holder. d Presser foot holder screw Use the presser foot holder screw to hold the presser foot holder in place. e Presser foot The presser foot applies pressure consistently on the fabric as the sewing takes place. Attach the appropriate presser foot for the selected stitching. f Needle plate cover release Use when removing the needle plate cover. g Needle plate cover h Feed dogs The feed dogs feed the fabric in the sewing direction. i Quick-set bobbin (for models equipped with the quick-set bobbin) You can start sewing without pulling up the bobbin thread. j Bobbin cover k Needle plate The needle plate is marked with guides for sewing straight seams. l Needle bar thread guide (page 16) m Presser foot lever Raise and lower the presser foot. n Needle clamp screw Operation buttons The operation buttons differ depending on the sewing machine model. Press the reverse/reinforcement stitch button to sew reverse stitches. Reverse stitches are sewn by keeping the button pressed down to sew in the opposite direction. For details, refer to "Sewing reinforcement stitches" (page 26). ■ Buttons provided on some models b Start/stop button Press the start/stop button to start or stop sewing. The machine sews at a slow speed at the beginning of sewing while the button is depressed. When sewing is stopped, the needle is lowered in the fabric. For details, refer to "Starting to sew" (page 25). c Needle position button Press this button to raise or lower the needle. d Sewing speed controller Slide this controller to adjust the sewing speed. Operation panel The operation panel allows you to select a stitch and specify how the stitch will be sewn. The operation panel differs depending on the sewing machine model. a LCD (liquid crystal display) The number of the selected stitch (1), the presser foot type to be used (2), the stitch length (mm) (3), and the stitch width (mm) (4) are displayed here. b Stitch selection keys (page 24) Select the number for the stitch that you wish to use. c Stitch length adjustment key Press the "-" side to reduce the stitch length; press the "+" side to increase the stitch length. d Stitch width adjustment key Press the "-" side to reduce the stitch width; press the "+" side to increase the stitch width. ■ Keys and indicators provided on some models 65 a Reverse/reinforcement stitch button 6 87
-
 1
1 -
2
-
 3
3 -
 4
4 -
 5
5 -
 6
6 -
 7
7 -
 8
8 -
 9
9 -
 10
10 -
 11
11 -
 12
12 -
 13
13 -
14
-
15
-
16
-
17
-
18
-
19
-
20
-
21
-
22
-
23
-
24
-
25
-
26
-
27
-
28
-
29
-
30
-
31
-
32
-
33
-
34
-
35
-
36
-
37
-
38
-
39
-
40
-
41
-
42
-
43
-
44
-
45
-
46
-
47
-
48
-
49
-
50
-
51
-
52
-
53
-
54
-
55
-
56
-
57
-
58
-
59
-
60
-
61
-
62
-
63
-
64
-
65
-
66
-
67
-
68
-
69
-
70
-
71
-
72
 |
 |