Brother International Innov-is 40e Operation Manual - Page 10
Introduction, Names of Machine Parts and Their Functions
 |
View all Brother International Innov-is 40e manuals
Add to My Manuals
Save this manual to your list of manuals |
Page 10 highlights
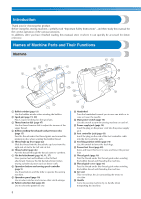
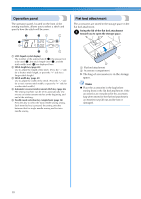
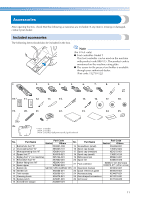
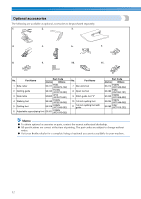
Introduction Thank you for choosing this product. Before using this sewing machine, carefully read "Important Safety Instructions", and then study this manual for the correct operation of the various functions. In addition, after you have finished reading this manual, store it where it can quickly be accessed for future reference. Names of Machine Parts and Their Functions Machine a Bobbin winder (page 15) Use the bobbin winder when winding the bobbin. b Spool pin (page 15, 20) Place a spool of thread on the spool pin. c Thread tension dial (page 47) Use the thread tension dial to adjust the tension of the upper thread. d Bobbin-winding thread guide and pretension disc (page 15) Pass the thread under this thread guide and around the pretension disc when winding the bobbin thread. e Thread take-up lever (page 22) Slide the thread into the thread take-up lever from the right side of slot to the left side of slot. f Thread cutter (page 46) Pass the threads through the thread cutter to cut them. g Flat bed attachment (page 10, 11, 37) Store presser feet and bobbins in the flat bed attachment. Remove the flat bed attachment when sewing cylindrical pieces such as sleeve cuffs. h Operation buttons and sewing speed controller (page 9) Use these buttons and the slide to operate the sewing machine. i Operation panel (page 10) Use to select stitches and various other stitch settings. j Pattern selection dial (page 40) Use to select the pattern to sew. 8 k Handwheel Turn the handwheel toward you to sew one stitch or to raise or lower the needle. l Main power switch (page 14) Use this switch to turn the sewing machine on and off. m Power supply jack (page 14) Insert the plug on the power cord into the power supply jack. n Foot controller jack (page 43) Insert the plug on the end of the foot controller cable into the foot controller jack. o Feed dog position switch (page 74) Use this switch to lower the feed dogs. p Presser foot lever (page 20) Raise and lower this lever to raise and lower the presser foot. q Thread guide (page 16) Pass the thread under this thread guide when winding the bobbin thread and threading the machine. r Thread guide cover (page 16) Pass the thread under this thread guide when winding the bobbin thread and threading the machine. s Air vent This vent allows the air surrounding the motor to circulate. t Handle Carry the sewing machine by its handle when transporting the machine.
-
 1
1 -
2
-
3
-
4
-
 5
5 -
 6
6 -
 7
7 -
 8
8 -
 9
9 -
 10
10 -
 11
11 -
 12
12 -
 13
13 -
 14
14 -
 15
15 -
16
-
17
-
18
-
19
-
20
-
21
-
22
-
23
-
24
-
25
-
26
-
27
-
28
-
29
-
30
-
31
-
32
-
33
-
34
-
35
-
36
-
37
-
38
-
39
-
40
-
41
-
42
-
43
-
44
-
45
-
46
-
47
-
48
-
49
-
50
-
51
-
52
-
53
-
54
-
55
-
56
-
57
-
58
-
59
-
60
-
61
-
62
-
63
-
64
-
65
-
66
-
67
-
68
-
69
-
70
-
71
-
72
-
73
-
74
-
75
-
76
-
77
-
78
-
79
-
80
-
81
-
82
-
83
-
84
-
85
-
86
-
87
-
88
-
89
-
90
-
91
-
92
-
93
-
94
-
95
-
96
-
97
-
98
-
99
-
100
-
101
-
102
-
103
-
104
-
105
-
106
-
107
-
108
-
109
-
110
-
111
-
112
 |
 |
