Brother International Innov-is 40e Operation Manual - Page 102
When the thread became, tangled under the bobbin, winder seat
 |
View all Brother International Innov-is 40e manuals
Add to My Manuals
Save this manual to your list of manuals |
Page 102 highlights
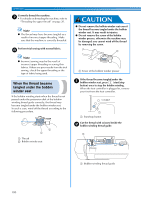
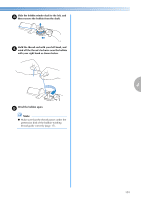
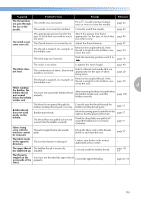
APPENDIX Correctly thread the machine. g • For details on threading the machine, refer to "Threading the upper thread" on page 20. Note ● The thread may have become tangled as a result of incorrect upper threading. Make sure that the machine is correctly threaded. Perform trial sewing with normal fabric. h CAUTION ● Do not remove the bobbin winder seat even if the thread become tangled under the bobbin winder seat. It may result in injuries. ● Do not remove the screw of the bobbin winder presser, otherwise the machine may be damaged; you cannot wind off the thread by removing the screw. a Note ● Incorrect sewing may be the result of incorrect upper threading or sewing thin fabrics. If there are poor results from the trial sewing, check the upper threading or the type of fabric being used. When the thread became tangled under the bobbin winder seat If the bobbin winding starts when the thread is not passed under the pretension disk of the bobbinwinding thread guide correctly, the thread may become tangled under the bobbin winder seat. In such a case, wind off the thread according to the following procedure. b a a Thread b Bobbin winder seat a Screw of the bobbin winder presser If the thread become tangled under the a bobbin winder seat, press (start/stop button) once to stop the bobbin winding. When the foot controller is plugged in, remove your foot from the foot controller. a Start/stop button Cut the thread with scissors beside the b bobbin-winding thread guide. a a Bobbin-winding thread guide 100
-
 1
1 -
2
-
3
-
4
-
5
-
6
-
7
-
8
-
9
-
10
-
11
-
12
-
13
-
14
-
15
-
16
-
17
-
18
-
19
-
20
-
21
-
22
-
23
-
24
-
25
-
26
-
27
-
28
-
29
-
30
-
31
-
32
-
33
-
34
-
35
-
36
-
37
-
38
-
39
-
40
-
41
-
42
-
43
-
44
-
45
-
46
-
47
-
48
-
49
-
50
-
51
-
52
-
53
-
54
-
55
-
56
-
57
-
58
-
59
-
60
-
61
-
62
-
63
-
64
-
65
-
66
-
67
-
68
-
69
-
70
-
71
-
72
-
73
-
74
-
75
-
76
-
77
-
78
-
79
-
80
-
81
-
82
-
83
-
84
-
85
-
86
-
87
-
88
-
89
-
90
-
91
-
92
-
93
-
94
-
95
-
96
-
 97
97 -
 98
98 -
 99
99 -
 100
100 -
 101
101 -
 102
102 -
 103
103 -
 104
104 -
 105
105 -
 106
106 -
 107
107 -
108
-
109
-
110
-
111
-
112
 |
 |
