Brother International Innov-is NQ1300PRW Operation Manual - Page 64
Sewing Various Fabrics
 |
View all Brother International Innov-is NQ1300PRW manuals
Add to My Manuals
Save this manual to your list of manuals |
Page 64 highlights
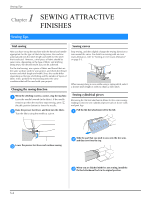
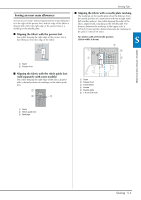
Sewing Various Fabrics Sewing Various Fabrics Sewing thick fabrics ■ If the fabric does not fit under the presser foot If the fabric does not fit easily under the presser foot, raise the presser foot lever even higher to bring the presser foot to its highest position. Release the presser foot locking pin (black button). d → The presser foot remains level, allowing the fabric to be fed. ■ If thick seams are being sewn and the fabric does not feed at the beginning of stitching The fabric may not feed when thick seams are being sewn and the presser foot is not level, as shown below. In this case, use the presser foot locking pin (black button on the left side of zigzag foot "J" so that the presser foot remains level while sewing, allowing the fabric to be fed smoothly. → After the seam is sewn, the presser foot will return to its original angle. Memo • You may find adjusting the "Presser Foot Pressure" in the settings screen helpful on some thick fabrics. • (For models equipped with Automatic Fabric Sensor System) When "Automatic Fabric Sensor System" in the settings screen is set to "ON", the thickness of the fabric is automatically detected by the internal sensor so the fabric can be fed smoothly for best sewing results. For details on the automatic fabric sensor system, refer to "Automatic Fabric Sensor System (Automatic presser foot pressure)" in the "Basic operations" section. a 1 Sewing direction Raise the presser foot lever. a Align the beginning of stitching, and then position the b fabric. While holding zigzag foot "J" level, hold the presser c foot locking pin (black button on the left side) pressed in, and lower the presser foot lever. CAUTION • If fabric more than 6 mm (15/64 inch) thick is sewn or if the fabric is pushed with too much force, the needle may bend or break. Sewing thin fabrics When sewing thin fabrics, the stitching may become misaligned or the fabric may not feed correctly. Move the needle (be sure to use a fine needle) to the furthest left or right hand position so that the fabric does not get pulled down into the feed dog area. If this occurs, place thin paper or stabilizer material under the fabric and sew it together with the fabric. When you have finished sewing, tear off any excess paper. 1 1 Presser foot holding pin (black button) 1 1 Stabilizer material or paper S-4
-
 1
1 -
2
-
3
-
4
-
5
-
6
-
7
-
8
-
9
-
10
-
11
-
12
-
13
-
14
-
15
-
16
-
17
-
18
-
19
-
20
-
21
-
22
-
23
-
24
-
25
-
26
-
27
-
28
-
29
-
30
-
31
-
32
-
33
-
34
-
35
-
36
-
37
-
38
-
39
-
40
-
41
-
42
-
43
-
44
-
45
-
46
-
47
-
48
-
49
-
50
-
51
-
52
-
53
-
54
-
55
-
56
-
57
-
58
-
 59
59 -
 60
60 -
 61
61 -
 62
62 -
 63
63 -
 64
64 -
 65
65 -
 66
66 -
 67
67 -
 68
68 -
 69
69 -
70
-
71
-
72
-
73
-
74
-
75
-
76
-
77
-
78
-
79
-
80
-
81
-
82
-
83
-
84
-
85
-
86
-
87
-
88
-
89
-
90
-
91
-
92
-
93
-
94
-
95
-
96
-
97
-
98
-
99
-
100
-
101
-
102
-
103
-
104
-
105
-
106
-
107
-
108
-
109
-
110
-
111
-
112
-
113
-
114
-
115
-
116
-
117
-
118
-
119
-
120
-
121
-
122
-
123
-
124
-
125
-
126
-
127
-
128
-
129
-
130
-
131
-
132
-
133
-
134
-
135
-
136
-
137
-
138
-
139
-
140
-
141
-
142
-
143
-
144
 |
 |
