Brother International Innov-is NQ1300PRW Operation Manual - Page 79
Zipper Insertion
 |
View all Brother International Innov-is NQ1300PRW manuals
Add to My Manuals
Save this manual to your list of manuals |
Page 79 highlights
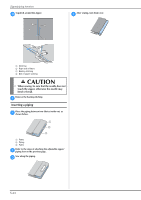
Zipper Insertion Zipper Insertion • Using the table below, refer to "Using the utility stitch tables in the "Sewing" section" in the "Basic operations" section. Press open the seam allowance from the wrong side of d the fabric. Stitch name Stitch Straight stitch (Middle) Stitch number 1-03 03* 03* J, I * Stitch patterns can be selected directly by pressing the numeric keys on the machine during preset utility stitch mode. Refer to "Basic operations" section. Inserting a centered zipper Stitching is sewn on both pieces of fabric butted against each other. Model 4 Model 3, 2 Model 1 Presser foot 1 S 1 Wrong side of fabric Align the seam with the center of the zipper, and then e baste the zipper in place. 2 1 3 UTILITY STITCHES 2 1 1 Wrong side of fabric 2 Basting stitching 3 Zipper Remove about 5 cm (2 inches) from the end of the f basting on the outside. 3 1 Right side of fabric 2 Stitching 3 End of zipper opening Attach zigzag foot "J". a Sew straight stitches up to the zipper opening. b With the right sides of the fabric facing each other, sew reverse stitches after reaching the zipper opening. Using a basting stitch, continue sewing to the edge of c the fabric. 1 3 2 4 1 Basting stitching 2 Reverse stitches 3 Wrong side of fabric 4 End of zipper opening 2 4 3 1 1 Wrong side of fabric 2 Zipper basting 3 Outside basting 4 5 cm (2 inches) Attach the presser foot holder to the right pin of zipper g foot "I". 1 I 2 1 Pin on the right side 2 Needle drop point Sewing S-19
-
 1
1 -
2
-
3
-
4
-
5
-
6
-
7
-
8
-
9
-
10
-
11
-
12
-
13
-
14
-
15
-
16
-
17
-
18
-
19
-
20
-
21
-
22
-
23
-
24
-
25
-
26
-
27
-
28
-
29
-
30
-
31
-
32
-
33
-
34
-
35
-
36
-
37
-
38
-
39
-
40
-
41
-
42
-
43
-
44
-
45
-
46
-
47
-
48
-
49
-
50
-
51
-
52
-
53
-
54
-
55
-
56
-
57
-
58
-
59
-
60
-
61
-
62
-
63
-
64
-
65
-
66
-
67
-
68
-
69
-
70
-
71
-
72
-
73
-
 74
74 -
 75
75 -
 76
76 -
 77
77 -
 78
78 -
 79
79 -
 80
80 -
 81
81 -
 82
82 -
 83
83 -
 84
84 -
85
-
86
-
87
-
88
-
89
-
90
-
91
-
92
-
93
-
94
-
95
-
96
-
97
-
98
-
99
-
100
-
101
-
102
-
103
-
104
-
105
-
106
-
107
-
108
-
109
-
110
-
111
-
112
-
113
-
114
-
115
-
116
-
117
-
118
-
119
-
120
-
121
-
122
-
123
-
124
-
125
-
126
-
127
-
128
-
129
-
130
-
131
-
132
-
133
-
134
-
135
-
136
-
137
-
138
-
139
-
140
-
141
-
142
-
143
-
144
 |
 |
