Brother International PE-DESIGN Ver.4 3 2 Owner's Manual - English - Page 174
Writing to an Original Card, Operation
 |
View all Brother International PE-DESIGN Ver.4 3 2 manuals
Add to My Manuals
Save this manual to your list of manuals |
Page 174 highlights
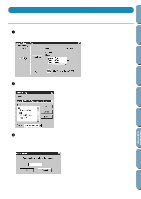
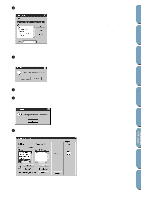
Contents Before Using Getting Started Design Center Layout & Editing Writing to an Original Card IMPORTANT: If you are using our company's scanner system, use two separate sets of original cards: one for the scanner system, and one for this system. Operation To transfer an embroidery file that you have created or edited with Layout & Editing to an original card, proceed as follows: 1 Click the arrow button in the Write to Original Card area. The application will first check that there is no problem with the card module and the card inserted. If no problem is detected, a Write to Original Card dialog similar to this displays. x The current folder and the *.PES files it contains are shown. x Click a file name in the left file box, then click Select. You can repeat this step to select more than one file. x Click Select All to select all files in the folder. x To deselect a file, click its file name in the right file box, then click Deselect. • As you select a file to be transferred to the card, its file name moves to the list on the right. However, if the available space on the card is not sufficient, the file is not selected, and this message appears: x To deselect all selected files, click Deselect All. x Click a file name, then click Preview to see the embroidery image. Click OK to remove the preview. x Click Browse to change the folder. x Click Write to write the selected file(s) to the card. The same message appears when you click Select All and there is not enough space on the card. Click OK to remove the message and try with other file(s). x Click Close to remove the dialog from the screen. File Utility Programmable Stich Creator Quick Reference Alphabetic Index 164
-
 1
1 -
2
-
3
-
4
-
5
-
6
-
7
-
8
-
9
-
10
-
11
-
12
-
13
-
14
-
15
-
16
-
17
-
18
-
19
-
20
-
21
-
22
-
23
-
24
-
25
-
26
-
27
-
28
-
29
-
30
-
31
-
32
-
33
-
34
-
35
-
36
-
37
-
38
-
39
-
40
-
41
-
42
-
43
-
44
-
45
-
46
-
47
-
48
-
49
-
50
-
51
-
52
-
53
-
54
-
55
-
56
-
57
-
58
-
59
-
60
-
61
-
62
-
63
-
64
-
65
-
66
-
67
-
68
-
69
-
70
-
71
-
72
-
73
-
74
-
75
-
76
-
77
-
78
-
79
-
80
-
81
-
82
-
83
-
84
-
85
-
86
-
87
-
88
-
89
-
90
-
91
-
92
-
93
-
94
-
95
-
96
-
97
-
98
-
99
-
100
-
101
-
102
-
103
-
104
-
105
-
106
-
107
-
108
-
109
-
110
-
111
-
112
-
113
-
114
-
115
-
116
-
117
-
118
-
119
-
120
-
121
-
122
-
123
-
124
-
125
-
126
-
127
-
128
-
129
-
130
-
131
-
132
-
133
-
134
-
135
-
136
-
137
-
138
-
139
-
140
-
141
-
142
-
143
-
144
-
145
-
146
-
147
-
148
-
149
-
150
-
151
-
152
-
153
-
154
-
155
-
156
-
157
-
158
-
159
-
160
-
161
-
162
-
163
-
164
-
165
-
166
-
167
-
168
-
 169
169 -
 170
170 -
 171
171 -
 172
172 -
 173
173 -
 174
174 -
 175
175 -
 176
176 -
 177
177 -
 178
178 -
 179
179 -
180
-
181
-
182
-
183
-
184
-
185
-
186
-
187
-
188
-
189
-
190
-
191
-
192
-
193
-
194
-
195
-
196
-
197
-
198
-
199
-
200
 |
 |
