Brother International PE-DESIGN Ver.4 3 2 Owner's Manual - English - Page 182
Using the Tool Box, Point Edit Mode, Moving points
 |
View all Brother International PE-DESIGN Ver.4 3 2 manuals
Add to My Manuals
Save this manual to your list of manuals |
Page 182 highlights
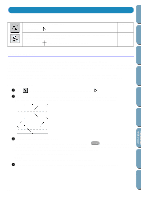
Contents Before Using Getting Started Design Center Layout & Editing Using the Tool Box Sets the cursor in point edit mode. Cursor shape: Sets the cursor in line drawing mode. When you start the application, the drawing mode is active by default. Cursor shape: with a miniature of the tool button page 172 page 173 Point Edit Mode The point edit mode allows you to move, insert and delete points of a stitch pattern. The points you move or insert are positioned at the intersection of the horizontal and vertical lines of the grid. So, regardless on where you drag a point to or insert a point on the line, it will automatically position itself at the nearest intersection. Depending on the stitch you want to create, you may need to select a different working grid. For more information on the grids and on how to select them, refer to "Grid Menu" on page 177. s Moving points 1 Click on the Tool Box. The shape of the cursor changes to . 2 Click the broken line that you want to edit. You can only select one broken line at a time. The existing points of the selected broken line are marked with small empty squares. File Utility Programmable Stich Creator Quick Reference Alphabetic Index 3 Click the point that you want to move. To select an additional point, click that point while holding the Shift key down. You may also click and drag the cursor over the area which includes all the points that you want to select. When you release the mouse, the points included in that area are selected. The selected points are marked by filled squares. NOTE: If you click on the line instead of a square, a new point is inserted. 4 Drag the cursor to a new position. All the selected points move in the same direction. 172
-
 1
1 -
2
-
3
-
4
-
5
-
6
-
7
-
8
-
9
-
10
-
11
-
12
-
13
-
14
-
15
-
16
-
17
-
18
-
19
-
20
-
21
-
22
-
23
-
24
-
25
-
26
-
27
-
28
-
29
-
30
-
31
-
32
-
33
-
34
-
35
-
36
-
37
-
38
-
39
-
40
-
41
-
42
-
43
-
44
-
45
-
46
-
47
-
48
-
49
-
50
-
51
-
52
-
53
-
54
-
55
-
56
-
57
-
58
-
59
-
60
-
61
-
62
-
63
-
64
-
65
-
66
-
67
-
68
-
69
-
70
-
71
-
72
-
73
-
74
-
75
-
76
-
77
-
78
-
79
-
80
-
81
-
82
-
83
-
84
-
85
-
86
-
87
-
88
-
89
-
90
-
91
-
92
-
93
-
94
-
95
-
96
-
97
-
98
-
99
-
100
-
101
-
102
-
103
-
104
-
105
-
106
-
107
-
108
-
109
-
110
-
111
-
112
-
113
-
114
-
115
-
116
-
117
-
118
-
119
-
120
-
121
-
122
-
123
-
124
-
125
-
126
-
127
-
128
-
129
-
130
-
131
-
132
-
133
-
134
-
135
-
136
-
137
-
138
-
139
-
140
-
141
-
142
-
143
-
144
-
145
-
146
-
147
-
148
-
149
-
150
-
151
-
152
-
153
-
154
-
155
-
156
-
157
-
158
-
159
-
160
-
161
-
162
-
163
-
164
-
165
-
166
-
167
-
168
-
169
-
170
-
171
-
172
-
173
-
174
-
175
-
176
-
 177
177 -
 178
178 -
 179
179 -
 180
180 -
 181
181 -
 182
182 -
 183
183 -
 184
184 -
 185
185 -
 186
186 -
 187
187 -
188
-
189
-
190
-
191
-
192
-
193
-
194
-
195
-
196
-
197
-
198
-
199
-
200
 |
 |
