Canon 0324B001 SELPHY ES1 User Guide - Page 32
Press the PRINT/STOP button.
 |
UPC - 013803065541
View all Canon 0324B001 manuals
Add to My Manuals
Save this manual to your list of manuals |
Page 32 highlights
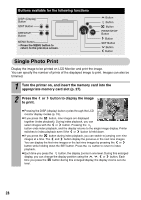
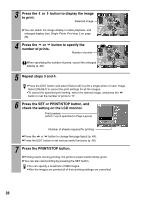
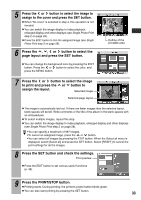
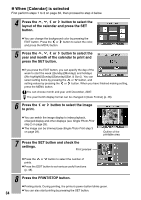
3 Press the or button to display the image to print. Selected image z You can switch the image display to index playback, and enlarged display (see Single Photo Print step 2 on page 28). 4 Press the or button to specify the number of prints. Number of prints When specifying the number of prints, cancel the enlarged display (p. 28). 5 Repeat steps 3 and 4. •Press the EDIT button and select [Select all] to print a single photo of each image. Select [RESET] to cancel the print settings for all the images. •To cancel the specified print setting, select the desired image, and press the button to set the number of prints to "0". 6 Press the SET or PRINT/STOP button, and check the setting on the LCD monitor. Print preview (when 1-up is specified in Page Layout) Number of sheets required for printing z Press the or button to change the page layout (p. 49). z Press the EDIT button to set various useful functions (p. 48). 7 Press the PRINT/STOP button. z Printing starts. During printing, the printer's power button blinks green. z You can also start printing by pressing the SET button. •You can specify a maximum of 998 images. •After the images are printed all of their printing settings are cancelled. 30
-
 1
1 -
2
-
3
-
4
-
5
-
6
-
7
-
8
-
9
-
10
-
11
-
12
-
13
-
14
-
15
-
16
-
17
-
18
-
19
-
20
-
21
-
22
-
23
-
24
-
25
-
26
-
 27
27 -
 28
28 -
 29
29 -
 30
30 -
 31
31 -
 32
32 -
 33
33 -
 34
34 -
 35
35 -
 36
36 -
 37
37 -
38
-
39
-
40
-
41
-
42
-
43
-
44
-
45
-
46
-
47
-
48
-
49
-
50
-
51
-
52
-
53
-
54
-
55
-
56
-
57
-
58
-
59
-
60
-
61
-
62
-
63
-
64
-
65
-
66
-
67
-
68
-
69
-
70
-
71
-
72
-
73
-
74
-
75
-
76
-
77
 |
 |
