Canon 0324B001 SELPHY ES1 User Guide - Page 35
button to select the image
 |
UPC - 013803065541
View all Canon 0324B001 manuals
Add to My Manuals
Save this manual to your list of manuals |
Page 35 highlights
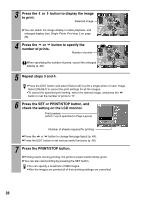
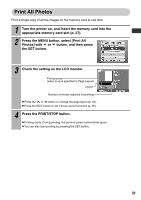
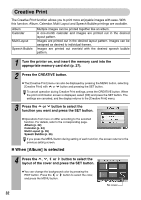
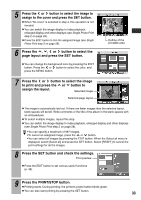
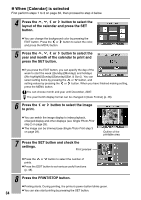
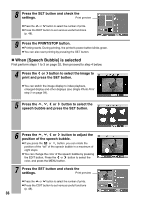
5 Press the or button to select the image to assign to the cover and press the SET button. z When "No cover" is selected in step 4, this operation is not needed. z You can switch the image display to index playback, enlarged display and other displays (see Single Photo Print step 2 on page 28). z Press the EDIT button to trim the assigned image (see Single Photo Print step 3 on page 29). 6 Press the , , or button to select the page layout and press the SET button. z You can change the background color by pressing the EDIT button. Press the or button to select the color, and press the MENU button. 7 Press the or button to select the image to print and press the or button to assign the layout. Selected image Selected page layout Outline of the printable area z The image is automatically laid out. If there are fewer images than the selected layout, blank spaces will be left. Write comments or the title of the album in the blank spaces with an oil-based pen. z To select multiple images, repeat this step. z You can switch the image display to index playback, enlarged display and other displays (see Single Photo Print step 2 on page 28). •You can specify a maximum of 997 images. •To cancel an assigned image, press the or button. •You can select all images by pressing the EDIT button. When the Select all menu is displayed, select [Select all] and press the SET button. Select [RESET] to cancel the print settings for all the images. 8 Press the SET button and check the settings. Print preview z Press the EDIT button to set various useful functions (p. 48). 9 Press the PRINT/STOP button. z Printing starts. During printing, the printer's power button blinks green. z You can also start printing by pressing the SET button. 33
-
 1
1 -
2
-
3
-
4
-
5
-
6
-
7
-
8
-
9
-
10
-
11
-
12
-
13
-
14
-
15
-
16
-
17
-
18
-
19
-
20
-
21
-
22
-
23
-
24
-
25
-
26
-
27
-
28
-
29
-
 30
30 -
 31
31 -
 32
32 -
 33
33 -
 34
34 -
 35
35 -
 36
36 -
 37
37 -
 38
38 -
 39
39 -
 40
40 -
41
-
42
-
43
-
44
-
45
-
46
-
47
-
48
-
49
-
50
-
51
-
52
-
53
-
54
-
55
-
56
-
57
-
58
-
59
-
60
-
61
-
62
-
63
-
64
-
65
-
66
-
67
-
68
-
69
-
70
-
71
-
72
-
73
-
74
-
75
-
76
-
77
 |
 |
