Canon 0324B001 SELPHY ES1 User Guide - Page 51
Layout
 |
UPC - 013803065541
View all Canon 0324B001 manuals
Add to My Manuals
Save this manual to your list of manuals |
Page 51 highlights
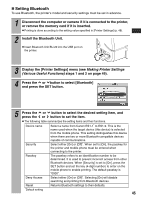
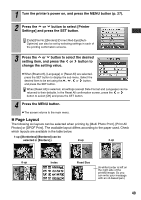
1 Turn the printer's power on, and press the MENU button (p. 27). 2 Press the or button to select [Printer Settings] and press the SET button. [Date]/[File No.]/[Borders]/[Correct Red-Eye]/[Auto Optimize] can also be set by selecting settings in each of the printing confirmation screens. 3 Press the or button to select the desired setting item, and press the or button to change the setting value. z When [Bluetooth], [Language] or [Reset All] are selected, press the SET button to display the sub menu. Select the desired item to be set using the , , or button, and press the SET button. When [Reset All] is selected, all settings (except Date Format and Language) can be returned to their defaults. In the Reset All confirmation screen, press the or button to select [OK] and press the SET button. 4 Press the MENU button. z The screen returns to the main menu. „ Page Layout The following six layouts can be selected when printing by [Multi Photo Print], [Print All Photos] or [DPOF Print]. The available layout differs according to the paper used. Check which layouts are available in the table below. 1-up ([Borderless]/[Bordered] can be selected in [Borders].) 2-up 4-up 8-up Index Fixed Size (A white border is left on the right side of the printed image. So you can write your message with an oil-based pen.) 49
-
 1
1 -
2
-
3
-
4
-
5
-
6
-
7
-
8
-
9
-
10
-
11
-
12
-
13
-
14
-
15
-
16
-
17
-
18
-
19
-
20
-
21
-
22
-
23
-
24
-
25
-
26
-
27
-
28
-
29
-
30
-
31
-
32
-
33
-
34
-
35
-
36
-
37
-
38
-
39
-
40
-
41
-
42
-
43
-
44
-
45
-
 46
46 -
 47
47 -
 48
48 -
 49
49 -
 50
50 -
 51
51 -
 52
52 -
 53
53 -
 54
54 -
 55
55 -
 56
56 -
57
-
58
-
59
-
60
-
61
-
62
-
63
-
64
-
65
-
66
-
67
-
68
-
69
-
70
-
71
-
72
-
73
-
74
-
75
-
76
-
77
 |
 |
