Canon 0324B001 SELPHY ES1 User Guide - Page 42
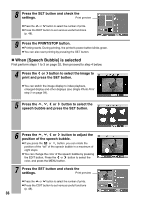
SELECT button.
 |
UPC - 013803065541
View all Canon 0324B001 manuals
Add to My Manuals
Save this manual to your list of manuals |
Page 42 highlights
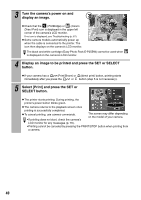
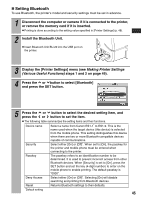
3 Turn the camera's power on and display an image. z Check that the (PictBridge) or (Canon Direct Print) icon is displayed in the upper left corner of the camera's LCD monitor. If no icon is displayed, see Troubleshooting (p. 67). z Some camera models automatically power up when the cable is connected to the printer. The icon then displays on the camera's LCD monitor. The black and white cartridge (Easy Photo Pack E-P25BW) cannot be used when is displayed on the camera's LCD monitor. 4 Display an image to be printed and press the SET or SELECT button. z If your camera has a (Print/Share) or (direct print) button, printing starts immediately after you press the or button (step 5 is not necessary). 5 Select [Print] and press the SET or SELECT button. z The printer starts printing. During printing, the printer's power button blinks green. z The camera returns to the playback screen once printing is successfully completed. z To cancel printing, use camera commands. •If printing does not start, check the camera's The screen may differ depending on the model of your camera. LCD monitor for any messages (p. 70). •Printing cannot be canceled by pressing the PRINT/STOP button when printing from a camera. 40
-
 1
1 -
2
-
3
-
4
-
5
-
6
-
7
-
8
-
9
-
10
-
11
-
12
-
13
-
14
-
15
-
16
-
17
-
18
-
19
-
20
-
21
-
22
-
23
-
24
-
25
-
26
-
27
-
28
-
29
-
30
-
31
-
32
-
33
-
34
-
35
-
36
-
 37
37 -
 38
38 -
 39
39 -
 40
40 -
 41
41 -
 42
42 -
 43
43 -
 44
44 -
 45
45 -
 46
46 -
 47
47 -
48
-
49
-
50
-
51
-
52
-
53
-
54
-
55
-
56
-
57
-
58
-
59
-
60
-
61
-
62
-
63
-
64
-
65
-
66
-
67
-
68
-
69
-
70
-
71
-
72
-
73
-
74
-
75
-
76
-
77
 |
 |
