Canon 0324B001 SELPHY ES1 User Guide - Page 33
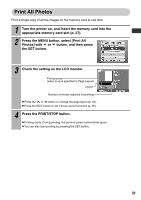
Print All Photos
 |
UPC - 013803065541
View all Canon 0324B001 manuals
Add to My Manuals
Save this manual to your list of manuals |
Page 33 highlights
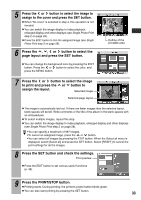
Print All Photos Print a single copy of all the images on the memory card at one time. 1 Turn the printer on, and insert the memory card into the appropriate memory card slot (p. 27). 2 Press the MENU button, select [Print All Photos] with or button, and then press the SET button. 3 Check the setting on the LCD monitor. Print preview (when 2-up is specified in Page Layout) Layout Number of sheets required for printing z Press the or button to change the page layout (p. 49). z Press the EDIT button to set various useful functions (p. 48). 4 Press the PRINT/STOP button. z Printing starts. During printing, the printer's power button blinks green. z You can also start printing by pressing the SET button. 31
-
 1
1 -
2
-
3
-
4
-
5
-
6
-
7
-
8
-
9
-
10
-
11
-
12
-
13
-
14
-
15
-
16
-
17
-
18
-
19
-
20
-
21
-
22
-
23
-
24
-
25
-
26
-
27
-
 28
28 -
 29
29 -
 30
30 -
 31
31 -
 32
32 -
 33
33 -
 34
34 -
 35
35 -
 36
36 -
 37
37 -
 38
38 -
39
-
40
-
41
-
42
-
43
-
44
-
45
-
46
-
47
-
48
-
49
-
50
-
51
-
52
-
53
-
54
-
55
-
56
-
57
-
58
-
59
-
60
-
61
-
62
-
63
-
64
-
65
-
66
-
67
-
68
-
69
-
70
-
71
-
72
-
73
-
74
-
75
-
76
-
77
 |
 |

31
Print All Photos
Print a single copy of all the images on the memory card at one time.
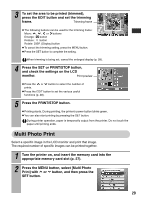
1
Turn the printer on, and insert the memory card into the
appropriate memory card slot (p. 27).
2
Press the MENU button, select [Print All
Photos] with
or
button, and then press
the SET button.
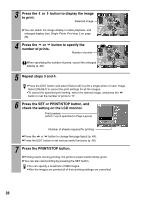
3
Check the setting on the LCD monitor.
Press the
or
button to change the page layout (p. 49).
Press the EDIT button to set various useful functions (p. 48).
4
Press the PRINT/STOP button.
Printing starts. During printing, the printer’s power button blinks green.
You can also start printing by pressing the SET button.
Number of sheets required for printing
Print preview
(when 2-up is specified in Page Layout)
Layout