Canon 0324B001 SELPHY ES1 User Guide - Page 36
When [Calendar] is selected
 |
UPC - 013803065541
View all Canon 0324B001 manuals
Add to My Manuals
Save this manual to your list of manuals |
Page 36 highlights
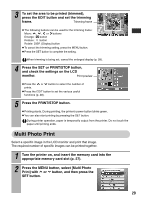
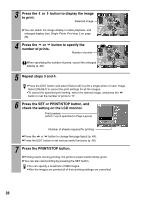
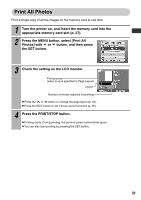
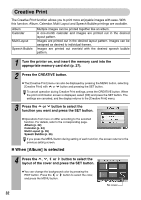
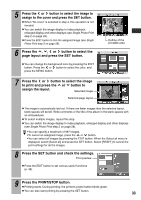
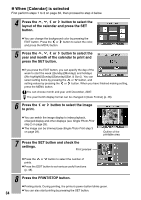
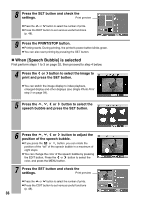
„ When [Calendar] is selected First perform steps 1 to 3 on page 32, then proceed to step 4 below. 4 Press the , , or button to select the layout of the calendar and press the SET button. z You can change the background color by pressing the EDIT button. Press the or button to select the color, and press the MENU button. 5 Press the , , or button to select the year and month of the calendar to print and press the SET button. z If you press the EDIT button, you can specify the day of the week to start the week ([Sunday]/[Monday]) and holidays ([No highlight]/[Sunday]/[Saturday]/[Sat. & Sun.]). You can select setting items by pressing the or button, and setting values by pressing the or button. When you have finished making setting, press the MENU button. You can choose month and year until December, 2037. The year/month display format can be changed in [Date Format] (p. 48). 6 Press the or button to select the image to print. z You can switch the image display to index playback, enlarged display and other displays (see Single Photo Print step 2 on page 28). z The image can be trimmed (see Single Photo Print step 3 on page 29). 7 Press the SET button and check the settings. Print preview Outline of the printable area z Press the or button to select the number of prints. z Press the EDIT button to set various useful functions (p. 48). 8 Press the PRINT/STOP button. z Printing starts. During printing, the printer's power button blinks green. z You can also start printing by pressing the SET button. 34
-
 1
1 -
2
-
3
-
4
-
5
-
6
-
7
-
8
-
9
-
10
-
11
-
12
-
13
-
14
-
15
-
16
-
17
-
18
-
19
-
20
-
21
-
22
-
23
-
24
-
25
-
26
-
27
-
28
-
29
-
30
-
 31
31 -
 32
32 -
 33
33 -
 34
34 -
 35
35 -
 36
36 -
 37
37 -
 38
38 -
 39
39 -
 40
40 -
 41
41 -
42
-
43
-
44
-
45
-
46
-
47
-
48
-
49
-
50
-
51
-
52
-
53
-
54
-
55
-
56
-
57
-
58
-
59
-
60
-
61
-
62
-
63
-
64
-
65
-
66
-
67
-
68
-
69
-
70
-
71
-
72
-
73
-
74
-
75
-
76
-
77
 |
 |
