Canon 0324B001 SELPHY ES1 User Guide - Page 37
When [Multi Layout] is selected
 |
UPC - 013803065541
View all Canon 0324B001 manuals
Add to My Manuals
Save this manual to your list of manuals |
Page 37 highlights
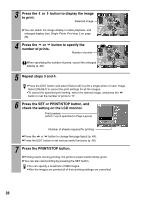
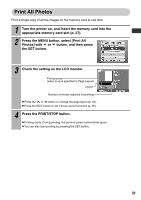
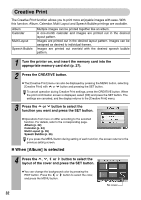
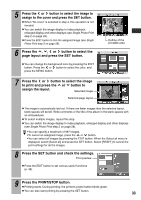
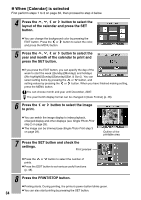
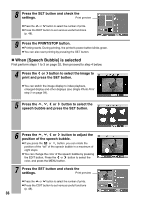
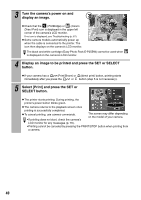
„ When [Multi Layout] is selected First perform steps 1 to 3 on page 32, then proceed to step 4 below. 4 Press the , , or button to select the layout and press the SET button. 2 images per sheet 4 images per sheet 8 images per sheet 3 images per sheet z You can change the background color by pressing the EDIT button. Press the or button to select the color, and press the MENU button. 8 images per sheet layout can be specified only when printing on card size paper. 5 Press the or button to select the image to assign to the initial frame and press the or button. z You can switch the image display to index playback, enlarged display and other displays (see Single Photo Print step 2 on page 28). Note that image information is not displayed. z Press the EDIT button to trim images assigned to the Outline of the printable area layout frame (see Single Photo Print step 3 on page 29). Note that trimming is performed matching the aspect ratio of the assigned layout frame (e.g., width-to-height ratio approximately 4:3 for 2-up and 4-up). To cancel an assigned image, press the or button again. 6 Press the DISP. (Display) button to select the next frame. Outline of the printable area Layout frame already assigned an image Currently selected layout frame 7 Repeat steps 5 and 6 to assign images to desired frames. z If you want to create a blank space, press the DISP. (Display) button to move the frame. Write comments or the title in the blank spaces with an oil-based pen. 35
-
 1
1 -
2
-
3
-
4
-
5
-
6
-
7
-
8
-
9
-
10
-
11
-
12
-
13
-
14
-
15
-
16
-
17
-
18
-
19
-
20
-
21
-
22
-
23
-
24
-
25
-
26
-
27
-
28
-
29
-
30
-
31
-
 32
32 -
 33
33 -
 34
34 -
 35
35 -
 36
36 -
 37
37 -
 38
38 -
 39
39 -
 40
40 -
 41
41 -
 42
42 -
43
-
44
-
45
-
46
-
47
-
48
-
49
-
50
-
51
-
52
-
53
-
54
-
55
-
56
-
57
-
58
-
59
-
60
-
61
-
62
-
63
-
64
-
65
-
66
-
67
-
68
-
69
-
70
-
71
-
72
-
73
-
74
-
75
-
76
-
77
 |
 |
