Canon CanoScan FB 630U User Guide - Page 10
Verify Image Quality with the Browser Function Before Scanning
 |
View all Canon CanoScan FB 630U manuals
Add to My Manuals
Save this manual to your list of manuals |
Page 10 highlights
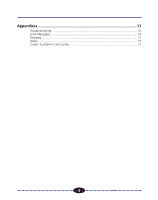
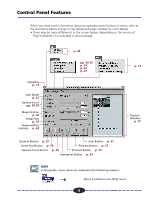
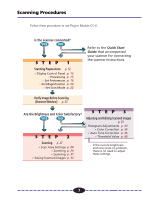
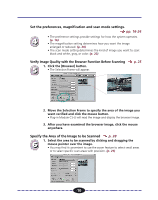
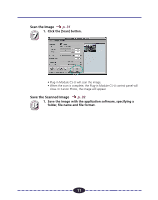
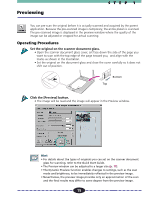
Set the preferences, magnification and scan mode settings. pp. 16-24 • The preference settings provide settings for how the system operates. 4 (p. 16) • The magnification setting determines how you want the image enlarged or reduced. (p. 20) • The scan mode setting determines the kind of image you want to scan: black and white, gray, or color. (p. 22) Verify Image Quality with the Browser Function Before Scanning 1. Click the [Browser] button. 5 • The Selection Frame will appear. p. 25 ª 2. Move the Selection Frame to specify the area of the image you want verified and click the mouse button. • Plug-in Module CS-U will read the image and display the browser image. 3. After you have examined the browser image, click the mouse anywhere. Specify the Area of the Image to be Scanned p. 28 1. Select the area to be scanned by clicking and dragging the 6 mouse pointer over the image. • You may find it convenient to use the zoom feature to select small areas or to select specific scan areas with precision. (p. 29) 10
-
 1
1 -
2
-
3
-
4
-
 5
5 -
 6
6 -
 7
7 -
 8
8 -
 9
9 -
 10
10 -
 11
11 -
 12
12 -
 13
13 -
 14
14 -
 15
15 -
16
-
17
-
18
-
19
-
20
-
21
-
22
-
23
-
24
-
25
-
26
-
27
-
28
-
29
-
30
-
31
-
32
-
33
-
34
-
35
-
36
-
37
-
38
-
39
-
40
-
41
-
42
-
43
-
44
-
45
-
46
-
47
-
48
-
49
-
50
-
51
-
52
-
53
-
54
-
55
-
56
-
57
-
58
-
59
-
60
-
61
-
62
 |
 |