Canon CanoScan FB 630U User Guide - Page 36
Adjusting the Image with Gamma Settings, Setting the Gamma
 |
View all Canon CanoScan FB 630U manuals
Add to My Manuals
Save this manual to your list of manuals |
Page 36 highlights
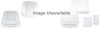
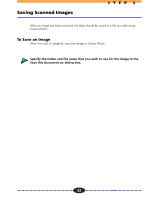
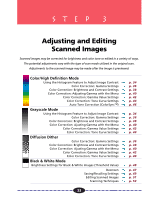
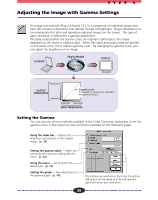
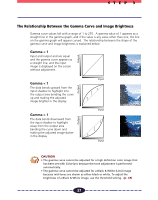
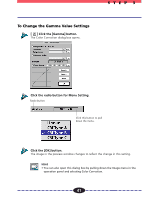
STEP 3 Adjusting the Image with Gamma Settings An image scanned with Plug-in Module CS-U is a composite of individual square dots. Each dot contains information that defines its level of brightness. Plug-in Module CS-U can manipulate this data and reproduce adjusted images on the screen. This type of data conversion is referred to a gamma adjustment. The data created when the scanner scans an original is called input; the image displayed on the screen is called output. When this input and output data are plotted on the same curve, this is called a gamma curve. By changing the gamma curve, you can adjust the brightness of an image. SCANNER Plug-in Module DISPLAY HIGHLIGHT OUTPUT BRIGHTNESS SHADOW Gamma curve A straight or curved line indicates the gamma status. SHADOW HIGHLIGHT INPUT BRIGHTNESS Setting the Gamma You can use one of four methods available in the Color Correction dialog box to set the gamma curve. A description of each method is provided on the following pages. Using the slider bar - Adjusts the brightness and contrast of the original image. (p. 38) Setting the gamma value - When you cannot do the optimum setting with the menu. (p. 42) Using the menu - Set to match the display type. (p. 40) Setting the graph - Fine adjustment of the gamma graph. (p. 44) The settings you perform in the Color Correction dialog box can be saved to a file and opened again whenever you need them. 36
-
 1
1 -
2
-
3
-
4
-
5
-
6
-
7
-
8
-
9
-
10
-
11
-
12
-
13
-
14
-
15
-
16
-
17
-
18
-
19
-
20
-
21
-
22
-
23
-
24
-
25
-
26
-
27
-
28
-
29
-
30
-
 31
31 -
 32
32 -
 33
33 -
 34
34 -
 35
35 -
 36
36 -
 37
37 -
 38
38 -
 39
39 -
 40
40 -
 41
41 -
42
-
43
-
44
-
45
-
46
-
47
-
48
-
49
-
50
-
51
-
52
-
53
-
54
-
55
-
56
-
57
-
58
-
59
-
60
-
61
-
62
 |
 |