Canon DC10 DC20/DC10 Instruction Manual - Page 65
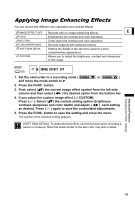
Applying Image Enhancing Effects
 |
UPC - 013803041583
View all Canon DC10 manuals
Add to My Manuals
Save this manual to your list of manuals |
Page 65 highlights
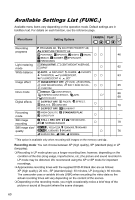
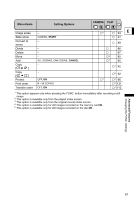
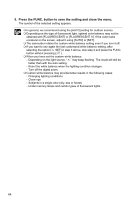
Applying Image Enhancing Effects You can record with different color saturation and contrast effects. IMAGE EFFECT OFF Records with no image enhancing effects. E VIVID Emphasizes the contrast and color saturation. NEUTRAL Tones down the contrast and color saturation. LOW SHARPENING Records subjects with softened outlines. SOFT SKIN DETAIL Softens the details in the skin tone area for a more complimentary appearance. CUSTOM Allows you to adjust the brightness, contrast and sharpness of the image. ( 59) IMAGE EFFECT OFF 1. Set the camcorder to a recording mode ( or ) and move the mode switch to . 2. Press the FUNC. button. 3. First, select ( ) the current image effect symbol from the left side column and then select ( ) the desired option from the bottom bar. 4. If you select the custom image effect [ CUSTOM]: Press ( ). Select ( ) the custom setting option (brightness, contrast, sharpness and color depth) and adjust ( ) each setting as desired. Press ( ) again to save the customized adjustments. 5. Press the FUNC. button to save the setting and close the menu. The symbol of the selected setting appears. [SOFT SKIN DETAIL]: To obtain the best effect, use this function when recording a person in close-up. Note that areas similar to the skin color may lack in detail. Advanced Features Changing the FUNC. Settings 65
-
 1
1 -
2
-
3
-
4
-
5
-
6
-
7
-
8
-
9
-
10
-
11
-
12
-
13
-
14
-
15
-
16
-
17
-
18
-
19
-
20
-
21
-
22
-
23
-
24
-
25
-
26
-
27
-
28
-
29
-
30
-
31
-
32
-
33
-
34
-
35
-
36
-
37
-
38
-
39
-
40
-
41
-
42
-
43
-
44
-
45
-
46
-
47
-
48
-
49
-
50
-
51
-
52
-
53
-
54
-
55
-
56
-
57
-
58
-
59
-
 60
60 -
 61
61 -
 62
62 -
 63
63 -
 64
64 -
 65
65 -
 66
66 -
 67
67 -
 68
68 -
 69
69 -
 70
70 -
71
-
72
-
73
-
74
-
75
-
76
-
77
-
78
-
79
-
80
-
81
-
82
-
83
-
84
-
85
-
86
-
87
-
88
-
89
-
90
-
91
-
92
-
93
-
94
-
95
-
96
-
97
-
98
-
99
-
100
-
101
-
102
-
103
-
104
-
105
-
106
-
107
-
108
-
109
-
110
-
111
-
112
-
113
-
114
-
115
-
116
-
117
-
118
-
119
-
120
-
121
-
122
-
123
-
124
-
125
-
126
-
127
-
128
-
129
-
130
-
131
-
132
-
133
-
134
-
135
-
136
-
137
-
138
-
139
-
140
-
141
-
142
-
143
-
144
-
145
-
146
-
147
-
148
 |
 |
