Canon DR 5010C User Manual
Canon DR 5010C - imageFORMULA - Document Scanner Manual
 |
UPC - 013803071535
View all Canon DR 5010C manuals
Add to My Manuals
Save this manual to your list of manuals |
Canon DR 5010C manual content summary:
- Canon DR 5010C | User Manual - Page 1
Document Scanner Startup Manual Please read this manual before operating this unit. After you finish reading this manual, store it in a safe place for future reference. - Canon DR 5010C | User Manual - Page 2
is an open system in which business proprietors can participate voluntarily. The targeted products are office equipment, such as computers, monitors, printers, fax, machine, copiers, and scanners. The standards and logos are uniform among participating nations. Trademarks • Canon and the Canon logo - Canon DR 5010C | User Manual - Page 3
THIS AGREEMENT, DO NOT OPEN THE SEALED DISK PACKAGE AND PROMPTLY RETURN THE CANON SCANNER, THE DISK PACKAGE CONTAINING SCANNER DRIVER SOFTWARE PROGRAMS AND/OR SCANNER UTILITY SOFTWARE PROGRAM PROPRIETARY TO CANON OR ITS LICENSOR (THE "SOFTWARE") AND THE ACCOMPANYING DOCUMENTATION AND OTHER ITEMS TO - Canon DR 5010C | User Manual - Page 4
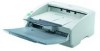
Scanner The DR-5010C scanner has a Startup Manual (this manual) and online help. Please refer to the Startup Manual regarding the handling of the scanner, such as installation of software and setting up the scanner. The online help explains how to use the ISIS/TWAIN driver and the enclosed software - Canon DR 5010C | User Manual - Page 5
uses the following symbols and indications. Before you start reading this manual, read the following and familiarize yourself with their meanings. WARNING Indicates a warning concerning operations that may lead to death or injury to persons if not - Canon DR 5010C | User Manual - Page 6
65 Removing and Attaching the Rollers 67 Roller Replacement Message 67 Resetting the Counter 68 Removing and Attaching the Pickup Roller 70 Removing and Attaching the Feed Roller 73 Removing and Attaching the Retard Roller 77 Troubleshooting ...81 Specifications ...87 Index ...90 4 Contents - Canon DR 5010C | User Manual - Page 7
Location 17.7" (450 mm) when the Document Feed Tray and Document Feed Tray Extension are closed At least 3.9" (100 mm) when Eject Tray is empty 29.5" (750 mm) when the Document Feed Tray and Document Feed Tray Extension are open The performance of this scanner is affected by the environment in - Canon DR 5010C | User Manual - Page 8
any questions concerning your local power supply, contact your local authorized Canon dealer or your local power company. Moving the Scanner • To avoid dropping or damaging the scanner, always carry it with two hands. The scanner weighs approximately 23 lb (10.2 kg). • Make sure to disconnect the - Canon DR 5010C | User Manual - Page 9
unplug the power cord. Contact your local authorized Canon dealer or service representative to have the scanner serviced. • Always turn the scanner OFF and unplug the power cord before moving the scanner. • Notice to Cardiac Pacemaker Users This product generates a weak magnetic field. If you use - Canon DR 5010C | User Manual - Page 10
if it falls or tips over. • Do not block the Ventilation Openings. Doing so could cause the scanner to overheat, creating a risk of fire. • Do not place paper clips, staples, necklaces, or any other metallic objects on top of the scanner. Liquids or small metallic objects that get inside of the - Canon DR 5010C | User Manual - Page 11
Features of the DR-5010C The main features of the DR-5010C scanner are listed below. ■ Fast Document Feeding The scanner can scan a maximum of 50 documents per minute in a range of sizes from business cards to 11.6" x 17"/A3 size. (Scanning conditions: Black and white, LTR/A4 size portrait, two - Canon DR 5010C | User Manual - Page 12
only be used when the software supports multistreaming. ■ Auto Start The scanner is equipped with an Auto Start function that automatically initiates scanning when a document is placed in the document feed tray. ■ Compatible with Carbonless Duplicating Paper The scanner is able to scan carbonless - Canon DR 5010C | User Manual - Page 13
local authorized Canon dealer or service representative. DR-5010C Scanner Document Startup Manual Scanner KeeRpeathdisthmisamnuaanluinalathsoarfoeupglhalcyebfeofrofruetuurseinrgeftehriesnsccea.nner. Startup Manual (This Manual) Quick Reference Guide Document Eject Guide DR-5010C Setup Disc - Canon DR 5010C | User Manual - Page 14
. 1. Remove the protective tape from the scanner. 2. Slowly open the Document Feed Tray, then remove the protective tape. Feed tray 3. Hold the edge of the Upper unit as shown in the diagram, and slowly open it until it stops. Upper unit CAUTION The pickup roller is located in the middle of the - Canon DR 5010C | User Manual - Page 15
Remove the protective sheet then the protective material securing the pickup roller. Pickup Roller 5. Remove the roller cover, then remove the protective material securing the retard roller. Replace the roller cover. Roller Cover Retard Roller 6. Gently close the Upper unit. Be sure that the Upper - Canon DR 5010C | User Manual - Page 16
scanning. Document Eject Tray 1 Scanned documents are ejected here. (See p. 45.) Document Guides Adjust them to align with the width of the document. Document Stopper Moves up and down according to the paper feed switch lever. (See p. 49.) Power Indicator This indicator lights when the scanner is - Canon DR 5010C | User Manual - Page 17
Document Eject Tray 2 Switch the direction documents are eject by opening or closing this tray. (See p. 46.) Interface Ventilation Openings Power Connector Connect to the power cord. (See p. 24.) Ventilation Openings CAUTION Do not block the Ventilation Openings. Doing so could cause the scanner - Canon DR 5010C | User Manual - Page 18
Installing the Scanner Installation Requirements In order to use the DR-5010C, your computer must satisfy the following system requirements: • A computer that meets the following specifications: - CPU: Pentium 4 (1.5 GHz or higher) - Memory: 512 MB or more (1 GB or more recommended) - Hard disk: 1 - Canon DR 5010C | User Manual - Page 19
• Use the most recently available SCSI or USB 2.0 driver when using the DR5010C. Contact your local authorized Canon dealer or service representative. for more detailed information. • If the CPU, memory, interface card, and other specifications do not satisfy those recommended, the scanning speed - Canon DR 5010C | User Manual - Page 20
in your computer. (See "Interface Cards," on p. 19.) 2. Connect the scanner to the PC. (See "Connecting the Scanner to Your PC," on p. 21.) 3. Connect the power cord to the scanner. (See "Connecting the Power Cord," on p. 24.) 4. Turn the scanner ON first, and then boot up the PC. (See "Turning the - Canon DR 5010C | User Manual - Page 21
supports SCSI III. SCSI Cards When connecting the scanner via SCSI, verify that the SCSI card you are using is one recommended for use with the scanner Models: APA-1480 IMPORTANT • Follow the instructions in your computer's and the SCSI card's manuals to install the SCSI card into your computer - Canon DR 5010C | User Manual - Page 22
IMPORTANT • Follow the instructions in your computer's and the USB 2.0 interface card's manuals to install the USB 2.0 interface card into your computer. • Use the most recent version of the USB 2.0 driver provided by Microsoft. Note If the USB 2.0 interface is not compatible with Hi-Speed USB 2.0, - Canon DR 5010C | User Manual - Page 23
interface cable. • Do not connect both a SCSI cable and a USB cable concurrently. • Do not connect multiple DR-5010C scanners to one (1) computer. • After having changed the connection, be sure to turn the scanner and the PC ON once again. Connecting via SCSI Notes on the Shape of Connectors and the - Canon DR 5010C | User Manual - Page 24
Dip Switches are on when they are down, and off when they are up. • To change the SCSI ID, be sure to turn OFF the scanner and the computer and refer to the following table to set the SCSI ID. Default Settings (SCSI ID = 2) 12 ON SCSI ID 2 3 4 5 SW1 OFF ON - Canon DR 5010C | User Manual - Page 25
(See "USB 2.0 Interface Card," on p. 19.) Computer USB Cable DR-5010C IMPORTANT • If the operating system you are using is Windows NT, the connection via USB is not supported. When using the DR-5010C with Windows NT, be sure to connect the scanner via SCSI. • When using a USB hub, be sure to use - Canon DR 5010C | User Manual - Page 26
the power cord that is provided with this scanner to the power cord connector located on the rear of the scanner, and then plug the cord into a power outlet. WARNING • Be sure to use the power cord provided with the scanner. • Be sure the scanner is turned OFF before connecting the power cord - Canon DR 5010C | User Manual - Page 27
. Recognizing the Scanner If you are using Windows 98SE/Me/2000 or Windows XP, then the first time that you turn ON your PC after connecting this scanner to your PC, Windows Plug and Play automatically displays a screen prompting you to install the scanner driver. Follow the instructions on the - Canon DR 5010C | User Manual - Page 28
[Finish] button. • If you are using Windows Me, the [Add New Hardware Wizard] dialog box appears. 1. Select [Specify the location of the driver (Advanced)], and then click the [Next] [Install from a list or specific location (Advanced)], and then click the [Next] button. 26 Installing the Scanner - Canon DR 5010C | User Manual - Page 29
the driver "has not passed Windows logo testing", click the [Continue Anyway] button in the [Hardware Installation] dialog box. 5. Click the [Finish] button on the Completing the Found New Hardware Wizard screen. IMPORTANT • The DR-5010C is registered as "CANON DR-5010C SCSI" or "CANON DR-5010C USB - Canon DR 5010C | User Manual - Page 30
sure to open and read the Readme.txt file on the setup disc. The setup disc included with the scanner contains the following software: • ISIS/TWAIN Driver This driver allows this scanner to be used with ISIScompatible application software or TWAINcompatible application software. The driver must be - Canon DR 5010C | User Manual - Page 31
then click the [OK] button. The Installer starts. 5. Follow the instructions on the screen and complete the installation. 6. Restart Windows when you have completed the installation. Note Installing the ISIS/TWAIN driver creates the following shortcuts in the Start menu: Installing the Software 29 - Canon DR 5010C | User Manual - Page 32
Canon DR-5010C Help Online help for ISIS/TWAIN driver. (See "Using the ISIS/TWAIN Driver," on p. 35.) PATCH x(xx) (Patch Code Sample Sheet) These sheets are used to automatically separate batches of documents when the scanner recognizes the patch code pattern. (See "Using Patch Code Sheets," on p. - Canon DR 5010C | User Manual - Page 33
are using Windows NT 4.0 Workstation, Windows 2000 Professional, or Windows XP, be sure to log on as a user with administrator privileges. 2. Insert the setup disc in the PC's CD-ROM drive. 3. Click the [Start] button, and then select [Run]. The [Run] dialog box appears. 4. In the Open box, enter - Canon DR 5010C | User Manual - Page 34
Uninstalling Software Follow the procedure described below to uninstall the ISIS/TWAIN driver and CapturePerfect. IMPORTANT If you are using Windows NT 4.0 Workstation, Windows 2000 Professional, or Windows XP, be sure to log on as a user with administrator privileges. 1. Click the [Start] button, - Canon DR 5010C | User Manual - Page 35
Note If you are using Windows XP, the [Add or Remove Programs] dialog box is displayed. 3. Select [Canon DR-5010C Driver] or [CapturePerfect] from the list in the dialog box, and then click [Add/Remove]. Note If you are using Windows XP, click the [Change/Remove] button. Installing the Software 33 - Canon DR 5010C | User Manual - Page 36
4. The [Confirm File Deletion] dialog box appears. When [Canon DR-5010C Driver] is selected. When [CapturePerfect] is selected 5. Click the [Yes] button to start the uninstaller. Follow the instructions on the screen to finish uninstalling the software. 34 Installing the Software - Canon DR 5010C | User Manual - Page 37
]) - [Canon DR5010C], and then click [Canon DR-5010C Help], or click the Help button displayed in the dialog box. Note Before using the ISIS/TWAIN Driver, select the scanner [Canon DR-5010C] with the software. For more information, refer to [Canon DR-5010C Help] and the manual for the software you - Canon DR 5010C | User Manual - Page 38
], then refer to the explanation of how to use CapturePerfect. Starting CapturePerfect 1. Turn ON the scanner. 2. Turn ON your computer. Windows starts. 3. Click the [Start] button, point to [Programs] (when using Windows XP, point to All Programs), and then click [CapturePerfect]. 36 Using the - Canon DR 5010C | User Manual - Page 39
starts. 4. On the Scan menu, click [Select Scanner]. 5. Select [Canon DR-5010C], and then click the [OK] button. Note If [Canon DR-5010C] is not displayed in the list of scanners, re-install the ISIS/TWAIN driver. (See "Installing the ISIS/TWAIN Driver" on p. 28. ) Using the Software 37 - Canon DR 5010C | User Manual - Page 40
6. On the Scan menu, click [Scanner Setting] and then configure scanning parameters. Note For details about how to configure scanning parameters, see ISIS/TWAIN driver help. (See p. 35.) 7. Execute the scan complete, select [Exit] on the [File] menu to quit CapturePerfect. 38 Using the Software - Canon DR 5010C | User Manual - Page 41
Event Function DR-5010C and CapturePerfect support Windows Scanner Event function. By installing the ISIS/TWAIN driver and CapturePerfect, CapturePerfect starts automatically when the scanners Start Button is pressed. Note Windows NT does not support this function. Confirming Scanner Event 1. Double - Canon DR 5010C | User Manual - Page 42
2. Select [Canon DR-5010C SCSI] (or [Canon DR-5010C USB]), and then click the [Properties] buton to display Properties. 3. Click the [Events] tab. 40 Using the Software - Canon DR 5010C | User Manual - Page 43
by an event, it may not work correctly depending on the application. • To disable the Event function, check the [Disable device events] check box. • Restart Windows to enable new settings after changing the event settings. Using the - Canon DR 5010C | User Manual - Page 44
so that they have the same size, thickness, and weight. Scanning different types of paper at one time can cause the scanner to jam. • Scanning documents before the ink is dry can cause problems with the scanner. Always make sure that the ink on a document is dry before scanning it. 42 Using the - Canon DR 5010C | User Manual - Page 45
to subsequent documents. Always clean the rollers after scanning a document written in pencil. • When scanning a two-sided document that is printed on thin paper, the image on the opposite side of each page may show through. Adjust the scanning intensity in the application software before scanning - Canon DR 5010C | User Manual - Page 46
Up the Document Feed Tray and the Document Eject Tray 1. Hold the middle of the Document Feed Tray and slowly open it toward you. CAUTION Do not place anything other than documents on the Document Feed Tray. Doing so may damage the scanner, reduce scanning quality, or cause the feed tray to fall - Canon DR 5010C | User Manual - Page 47
Turn Path cannot be used if Document Eject Tray 2 is open. 2. Open the Document Eject Tray Extention toward you. IMPORTANT Be sure to open the Document Eject Tray Extention to use the U-Turn Path. If it is not opened, the documents may fly off the tray and cause a paper jam. Using the Scanner 45 - Canon DR 5010C | User Manual - Page 48
the scanner when using the Straight Path. If there is not enough space for ejected documents, the documents may be damaged or a paper jam may occur. • Open or close Document Eject Tray 2 before starting to scan documents. Opening or closing Document Eject Tray 2 while scanning may cause a paper jam - Canon DR 5010C | User Manual - Page 49
and become jammed in the scanner. Avoid this problem by attaching the Document Eject Guide. 1. Open the Document Eject Tray Extention toward you. 2. Attach the Document Eject Guide in the order ➀, ➁ as shown. 3. Press the Document Eject Guide to attach it to Document Eject Tray Extention. Using the - Canon DR 5010C | User Manual - Page 50
4. To remove the Document Eject Guide, lift the Document Eject Tray Extension a little and unhook the Document Eject Guide. 5. Reverse the procedure for attaching the Document Eject Guide to remove it. 48 Using the Scanner - Canon DR 5010C | User Manual - Page 51
for Scanning There are two methods for paper separation, called the Page Separation mode and Bypass mode for feeding documents. Feeding documents continuously from a stack of documents placed in the feed tray is called the Page Separation mode. Feeding documents one sheet at a time by hand or - Canon DR 5010C | User Manual - Page 52
a malfunction. • Be careful when placing a document in the scanner. It is possible to cut your hand on the edge of a sheet of paper. 3. Set the Document Guides so they are wider than the document to be scanned. 4. Place the documents face up into the Document Feed Tray and so they touch the stoppers - Canon DR 5010C | User Manual - Page 53
is loaded in the scanner correctly. Scanning a curled document or a creased document can damage the document. 6. Start scanning from the application. Note • If the paper feed operation stops due to a system error or a paper jam while the scanner is scanning, resolve the problem, make sure that the - Canon DR 5010C | User Manual - Page 54
of the scanner down ( ). Document Stopper Note • Lowering the Feed Selection Lever causes the Document Stoppers to go down. • The ISIS/TWAIN Driver settings change to the manual feed mode automatically when the Feed Selection Lever is lowered. 2. Place the document into the Document Feed Tray one - Canon DR 5010C | User Manual - Page 55
on the leading edge of the documents when you set them. When doing this, be careful not to get your fingers stuck in the pickup roller. Pickup Roller • After you finish scanning, close the Document Feed Tray and the Document Eject Tray Extension to prevent damage to the scanner while it is not being - Canon DR 5010C | User Manual - Page 56
in Windows, point to [Programs] - [Canon DR-5010C], and then click [PATCH X(XX)]. Then print the sheets to use them. Note To open the patch code sheets, you need to install CapturePerfect or Adobe Acrobat, which is provided with the scanner, or an application that can handle PDF (Portable Document - Canon DR 5010C | User Manual - Page 57
paper for [PATCH II (LTR)] and [PATCH T (LTR)] 2. Load the patch code sheet in front of the document where a file separator is to be inserted before scanning. Inserting Patch Code Sheets Load patch code sheets in front of the documents where a file separator is to be inserted. Using the Scanner - Canon DR 5010C | User Manual - Page 58
correctly. • To avoid a reading error, make sure that the scanning density for patch code sheets is neither too light nor too dark. 56 Using the Scanner - Canon DR 5010C | User Manual - Page 59
edge of a sheet of paper. 1. Remove any documents that have been left in the eject tray. 2. Close the Document Eject Tray Extention. 3. Hold the Upper unit as shown in the diagram, and open it to the point where you can remove the jammed document. CAUTION The pickup roller is located in the middle - Canon DR 5010C | User Manual - Page 60
4. Remove the jammed document. When the jam occurred in the feed section When the jam occurred in the eject section IMPORTANT Do not pull hard on the jammed sheet; remove it gently. If the sheet does rip, be sure to remove all of the remaining pieces of paper. 5. Close the Upper unit slowly. Be - Canon DR 5010C | User Manual - Page 61
IMPORTANT Do not force the Upper unit to close. Doing so may damage the scanner. Note After removing the jammed paper, check to see if the last page was scanned, and then continue scanning. Using the Scanner 59 - Canon DR 5010C | User Manual - Page 62
are skewed, then they may rub against the feed slot or the edges of the feed path and be damaged. The scanner is equipped with a Skew Detector function that detects when a skewed document hits the edge of the feed slot. When a skewed document is detected, an error message is displayed and scanning - Canon DR 5010C | User Manual - Page 63
Regular Maintenance Clean the scanner on a regular basis as described below to maintain peak scanning quality. CAUTION • When cleaning the scanner or inside of the scanner, turn OFF the Power Switch and unplug the power cord from the outlet. • The power needs to be ON when cleaning the rollers and - Canon DR 5010C | User Manual - Page 64
hold the protrusion on the Upper unit when you open it. Doing so may deform the pickup roller or cause a feeding error. Note The location of the sensor glass and various rollers are shown below. Platen Rollers Sensor Glasses Pickup Roller Feed Roller Rollers Retard Roller 62 Regular Maintenance - Canon DR 5010C | User Manual - Page 65
the scanner. Canon dealer or service representative to replace the sensor glass. 3. Wipe the rollers with a firmly wrung cloth moistened with water. Guide Board CAUTION Do not use detergent to clean the rollers, since any detergent on the rollers, could cause a feeding error. Regular Maintenance - Canon DR 5010C | User Manual - Page 66
force them to rotate. Just clean the part that you can see. Forcing the rollers to rotate may cause a feeding error. • Be careful not to bend the guide boards that are against the rollers on the Upper unit. 4. Remove the pickup roller, feed roller, and retard roller. (See "Removing and Attaching the - Canon DR 5010C | User Manual - Page 67
the Upper unit. Do not hold the protrusion on the Upper unit when you open it. Doing so may deform the pickup roller or cause a feeding error. IMPORTANT Be sure to open the Upper unit until it stops. If it is not opened all the way, the shading boards cannot come out. 3. Press the Start Button - Canon DR 5010C | User Manual - Page 68
pushing on both edges with both hands until you hear a click. IMPORTANT Do not force the Upper unit to close. Doing so may damage the scanner. 66 Regular Maintenance - Canon DR 5010C | User Manual - Page 69
them. IMPORTANT Feed rollers are consumable parts. When the rollers start to wear out, paper jams and misfeeds may occur more often. When this happens, buy a exchange roller kit, and replace the pickup roller, feed roller, and the retard roller. CAUTION • Turn ON the power to the scanner to remove - Canon DR 5010C | User Manual - Page 70
• Contact your local authorized Canon dealer or service representative for information about the exchange roller kit (pickup roller, retard roller, and feed roller). Resetting the Counter After replacing the feed rollers, reset the counter according to the following procedure. 1. Click the [Start] - Canon DR 5010C | User Manual - Page 71
3. Click on [Properties] for the scanner you are using. 4. Click the [Counter] tab. 5. Press the [Reset] button, and then make sure that the counter for the Roller being used is set to 0. Regular Maintenance 69 - Canon DR 5010C | User Manual - Page 72
Follow the procedures below to remove and attach the pickup roller for cleaning or replacement. CAUTION • Turn ON the power to the scanner to remove or attach the pickup roller. Be careful when working on the scanner when the power is ON. • Do not use excessive force when removing or attaching - Canon DR 5010C | User Manual - Page 73
the protrusion on the Upper unit when you open it. Doing so may deform the pickup roller or cause a feeding error. 3. Push up on the pickup roller to open the hook, and then remove the pickup roller. Attaching the Pickup Roller 1. Hold the new pickup roller (or the one you removed) by both sides - Canon DR 5010C | User Manual - Page 74
of the pickup roller is correctly inserted. 4. Close the Upper unit slowly. Be sure that the Upper unit is completely closed by pushing on both edges with both hands until you hear a click. IMPORTANT Do not force the Upper unit to close. Doing so may damage the scanner. 72 Regular Maintenance - Canon DR 5010C | User Manual - Page 75
the diagram, and open it slowly until it stops. CAUTION The pickup roller is located in the middle of the Upper unit. Do not hold the protrusion on the Upper unit when you lift it up. Doing so may deform the pickup roller or cause a feeding error. 2. Remove the roller cover. Regular Maintenance 73 - Canon DR 5010C | User Manual - Page 76
3. Move the roller lock lever down and forward (➀), and then slide it to the right (➁). 4. Shift the feed roller to the right to remove it. Attaching the Feed Roller 1. Position the feed roller so the notch in the roller is facing the scanner's shaft. 74 Regular Maintenance - Canon DR 5010C | User Manual - Page 77
2. Slide the roller lock lever to the left, and insert it into the feed roller hole. 3. Lift up the roller lock lever and lock the feed roller. 4. Attach the roller cover. Regular Maintenance 75 - Canon DR 5010C | User Manual - Page 78
5. Close the Upper unit slowly. Be sure that the Upper unit is completely closed by pushing on both edges with both hands until you hear a click. IMPORTANT Do not force the Upper unit to close. Doing so may damage the scanner. 76 Regular Maintenance - Canon DR 5010C | User Manual - Page 79
in the diagram, and open it slowly until it stops. CAUTION The pickup roller is located in the middle of the Upper unit. Do not hold the protrusion on the Upper unit when you open it. Doing so may deform the pickup roller or cause a feed error. 2. Remove the roller cover. Regular Maintenance 77 - Canon DR 5010C | User Manual - Page 80
3. Move the roller lock lever upward (➀), and then slide it to the right (➁). 4. Shift the retard roller to the right to remove it. Attaching the Retard Roller 1. Position the retard roller so the notch in the roller is facing the scanner's shaft. 78 Regular Maintenance - Canon DR 5010C | User Manual - Page 81
2. Slide the roller lock lever to the left, and insert it into the retard roller hole. 3. Move the roller lock lever forward and down to lock the retard roller. 4. Attach the roller cover. Regular Maintenance 79 - Canon DR 5010C | User Manual - Page 82
5. Close the Upper unit slowly. Be sure that the Upper unit is completely closed by pushing on both edges with both hands until you hear a click. IMPORTANT Do not force the Upper unit to close. Doing so may damage the scanner. 80 Regular Maintenance - Canon DR 5010C | User Manual - Page 83
Are Not Scanned p. 85 Documents Do Not Feed Properly p. 85 Resulting Scanned Images Are Not Correct p. 86 If after consulting the above section you still cannot resolve the problem, contact your local authorized Canon dealer or your service representative. The Scanner Does Not Turn ON Check - Canon DR 5010C | User Manual - Page 84
scanner. Check each possible cause. Cause Remedy The scanner is not connected correctly. Make sure that the scanner the instruction manual for the SCSI card and make the SCSI card settings again. Windows 2000 instruction manual for the SCSI card and reconfigure the SCSI card. 82 Troubleshooting - Canon DR 5010C | User Manual - Page 85
. (See p. 22.) Cause Remedy The terminator is not set correctly. Shut down both the PC and the scanner, and then turn the scanner ON first, and then the PC. (See p. 25.) Cause Remedy There is a problem with another SCSI device that is connected in the daisy chain. Do not use the daisy chain - Canon DR 5010C | User Manual - Page 86
card on the PC correctly referring to the instruction manual for the USB 2.0 interface card. Also, confirm whether the USB interface card is recognized by the operating system (Windows) you are using. Cause Remedy The scanner is not ON. Refer to "The Scanner Does Not Turn On," on p. 81 and maker - Canon DR 5010C | User Manual - Page 87
, see "Documents," on p. 42. Cause Remedy The rollers inside the scanner are dirty or worn. Refer to page 62 and clean the rollers. If the rollers are worn, then they need to be replaced. Contact your local authorized Canon dealer or service representative to purchase a exchange roller kit. For - Canon DR 5010C | User Manual - Page 88
the scanner driver, see "Installing the ISIS/TWAIN Driver," on p. 28. For details on how to install the application software, refer to the application software instruction manual. Cause Remedy Attempting to use a function of the DR-5010C that is not supported by the application software. Some - Canon DR 5010C | User Manual - Page 89
embossed cards is not guaranteed. Size: 2.12" x 3.37" (53.9 mm x 85.5 mm) Thickness: 0.03" ± 0.003" (0.76 ± 0.08 mm) Document Feeding Method Automatic/Manual Scanning Method Contact image sensor Light Source LED Scanning Side Simplex/Duplex Scanning Modes Black and white, Advanced text - Canon DR 5010C | User Manual - Page 90
specifications described above are subject to change without notice. Options Bar code module (product code: 0434B003) Additional software to allow the ISIS/TWAIN driver to recognize bar codes. Replacement parts Exchange roller kit (product code: 0434B002) Kit to replace the feed rollers (pickup - Canon DR 5010C | User Manual - Page 91
are millimeters) 15.6" (398.4) 7.6" (194) 7.4" (188) 5.6" (142) 7.5" (191.4) 3.2" (82) 26.3" (668) (Document Feed Tray Extension is open) 21.3" (541) (Document Feed Tray is open) 17.3" (440) (Document Eject Guide is open) 3.7" (95) (Document Eject Tray 2 is open) 12.3" (312) Specifications 89 - Canon DR 5010C | User Manual - Page 92
Maintenance 61 Rollers 67 Counter 68 Feed Roller 73 Pickup Roller 70 Replacement Message 67 Retard Roller 77 S Scanner Installation Procedure 18 Moving 6 Recognizing 25 Skew Detection Function 60 Specifications 87 Start Button 14 Stop Button 14 Straight Path 45,46 T Troubleshooting - Canon DR 5010C | User Manual - Page 93
MEMO - Canon DR 5010C | User Manual - Page 94
MEMO - Canon DR 5010C | User Manual - Page 95
Document Scanner, Model M11051 This device complies with Part in accordance with the instructions, may cause harmful manual. If such changes or modifications should be made, you could be required to stop operation of the equipment. Canon U.S.A. Inc. One Canon DR-5010C is identical to model M11051. - Canon DR 5010C | User Manual - Page 96
INC. 1248, SHIMOKAGEMORI, CHICHIBU-SHI, SAITAMA 369-1892, JAPAN CANON U.S.A. INC. ONE CANON PLAZA, LAKE SUCCESS, N.Y. 11042, U.S.A. CANON CANADA INC. 6390 DIXIE ROAD, MISSISSAUGA, ONTARIO L5T 1P7, CANADA CANON EUROPA N.V. BOVENKERKERWEG 59-61, P.O.BOX 2262, 1180 EG AMSTELVEEN, THE NETHERLANDS
-
 1
1 -
 2
2 -
 3
3 -
 4
4 -
 5
5 -
 6
6 -
 7
7 -
8
-
9
-
10
-
11
-
12
-
13
-
14
-
15
-
16
-
17
-
18
-
19
-
20
-
21
-
22
-
23
-
24
-
25
-
26
-
27
-
28
-
29
-
30
-
31
-
32
-
33
-
34
-
35
-
36
-
37
-
38
-
39
-
40
-
41
-
42
-
43
-
44
-
45
-
46
-
47
-
48
-
49
-
50
-
51
-
52
-
53
-
54
-
55
-
56
-
57
-
58
-
59
-
60
-
61
-
62
-
63
-
64
-
65
-
66
-
67
-
68
-
69
-
70
-
71
-
72
-
73
-
74
-
75
-
76
-
77
-
78
-
79
-
80
-
81
-
82
-
83
-
84
-
85
-
86
-
87
-
88
-
89
-
90
-
91
-
92
-
93
-
94
-
95
-
96
 |
 |
Startup Manual
Please read this manual before operating this unit. After you finish
reading this manual, store it in a safe place for future reference.
Document Scanner