Canon DR 5010C User Manual - Page 17
Interface - document eject tray
 |
UPC - 013803071535
View all Canon DR 5010C manuals
Add to My Manuals
Save this manual to your list of manuals |
Page 17 highlights
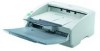
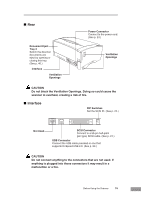
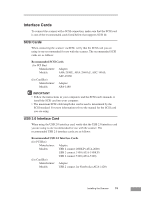
■ Rear Document Eject Tray 2 Switch the direction documents are eject by opening or closing this tray. (See p. 46.) Interface Ventilation Openings Power Connector Connect to the power cord. (See p. 24.) Ventilation Openings CAUTION Do not block the Ventilation Openings. Doing so could cause the scanner to overheat, creating a risk of fire. ■ Interface DIP Switches Set the SCSI ID. (See p. 22.) Not Used SCSI Connector Connect to a 50-pin half-pitch (pin type) SCSI cable. (See p. 21.) USB Connector Connect the USB cable provided or one that supports Hi-Speed USB 2.0. (See p. 23.) CAUTION Do not connect anything to the connectors that are not used. If anything is plugged into those connectors it may result in a malfunction or a fire. Before Using the Scanner 15
-
 1
1 -
2
-
3
-
4
-
5
-
6
-
7
-
8
-
9
-
10
-
11
-
 12
12 -
 13
13 -
 14
14 -
 15
15 -
 16
16 -
 17
17 -
 18
18 -
 19
19 -
 20
20 -
 21
21 -
 22
22 -
23
-
24
-
25
-
26
-
27
-
28
-
29
-
30
-
31
-
32
-
33
-
34
-
35
-
36
-
37
-
38
-
39
-
40
-
41
-
42
-
43
-
44
-
45
-
46
-
47
-
48
-
49
-
50
-
51
-
52
-
53
-
54
-
55
-
56
-
57
-
58
-
59
-
60
-
61
-
62
-
63
-
64
-
65
-
66
-
67
-
68
-
69
-
70
-
71
-
72
-
73
-
74
-
75
-
76
-
77
-
78
-
79
-
80
-
81
-
82
-
83
-
84
-
85
-
86
-
87
-
88
-
89
-
90
-
91
-
92
-
93
-
94
-
95
-
96
 |
 |
