Canon DR 5010C User Manual - Page 80
Attaching the Retard Roller
 |
UPC - 013803071535
View all Canon DR 5010C manuals
Add to My Manuals
Save this manual to your list of manuals |
Page 80 highlights
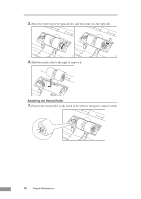
3. Move the roller lock lever upward (➀), and then slide it to the right (➁). 4. Shift the retard roller to the right to remove it. Attaching the Retard Roller 1. Position the retard roller so the notch in the roller is facing the scanner's shaft. 78 Regular Maintenance
-
 1
1 -
2
-
3
-
4
-
5
-
6
-
7
-
8
-
9
-
10
-
11
-
12
-
13
-
14
-
15
-
16
-
17
-
18
-
19
-
20
-
21
-
22
-
23
-
24
-
25
-
26
-
27
-
28
-
29
-
30
-
31
-
32
-
33
-
34
-
35
-
36
-
37
-
38
-
39
-
40
-
41
-
42
-
43
-
44
-
45
-
46
-
47
-
48
-
49
-
50
-
51
-
52
-
53
-
54
-
55
-
56
-
57
-
58
-
59
-
60
-
61
-
62
-
63
-
64
-
65
-
66
-
67
-
68
-
69
-
70
-
71
-
72
-
73
-
74
-
 75
75 -
 76
76 -
 77
77 -
 78
78 -
 79
79 -
 80
80 -
 81
81 -
 82
82 -
 83
83 -
 84
84 -
 85
85 -
86
-
87
-
88
-
89
-
90
-
91
-
92
-
93
-
94
-
95
-
96
 |
 |

78
Regular Maintenance
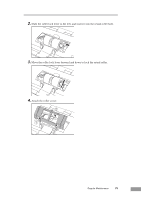
3.
Move the roller lock lever upward (
➀
), and then slide it to the right (
➁
).
4.
Shift the retard roller to the right to remove it.
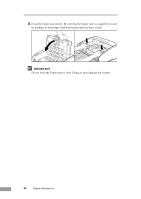
Attaching the Retard Roller
1.
Position the retard roller so the notch in the roller is facing the scanner's shaft.