Canon EOS 6D Instruction Manual - Page 108
Select a Web service., Select [WPS PBC mode]., Connect to the access point., Set the IP Address.
 |
View all Canon EOS 6D manuals
Add to My Manuals
Save this manual to your list of manuals |
Page 108 highlights
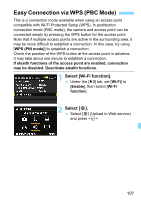
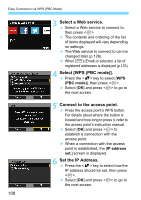
Easy Connection via WPS (PBC Mode) 3 Select a Web service. Select a Web service to connect to, then press . The contents and ordering of the list of items displayed will vary depending on settings. The Web service to connect to can be changed later (p.126). X When [ ] (Email) is selected, a list of registered addresses is displayed (p.125). 4 Select [WPS (PBC mode)]. Press the key to select [WPS (PBC mode)], then press . Select [OK] and press to go to the next screen. 5 Connect to the access point. Press the access point's WPS button. For details about where the button is located and how long to press it, refer to the access point's instruction manual. Select [OK] and press to establish a connection with the access point. X When a connection with the access point is established, the [IP address set.] screen is displayed. 6 Set the IP Address. Press the key to select how the IP address should be set, then press . Select [OK] and press to go to the next screen. 108
-
 1
1 -
2
-
3
-
4
-
5
-
6
-
7
-
8
-
9
-
10
-
11
-
12
-
13
-
14
-
15
-
16
-
17
-
18
-
19
-
20
-
21
-
22
-
23
-
24
-
25
-
26
-
27
-
28
-
29
-
30
-
31
-
32
-
33
-
34
-
35
-
36
-
37
-
38
-
39
-
40
-
41
-
42
-
43
-
44
-
45
-
46
-
47
-
48
-
49
-
50
-
51
-
52
-
53
-
54
-
55
-
56
-
57
-
58
-
59
-
60
-
61
-
62
-
63
-
64
-
65
-
66
-
67
-
68
-
69
-
70
-
71
-
72
-
73
-
74
-
75
-
76
-
77
-
78
-
79
-
80
-
81
-
82
-
83
-
84
-
85
-
86
-
87
-
88
-
89
-
90
-
91
-
92
-
93
-
94
-
95
-
96
-
97
-
98
-
99
-
100
-
101
-
102
-
 103
103 -
 104
104 -
 105
105 -
 106
106 -
 107
107 -
 108
108 -
 109
109 -
 110
110 -
 111
111 -
 112
112 -
 113
113 -
114
-
115
-
116
-
117
-
118
-
119
-
120
-
121
-
122
-
123
-
124
-
125
-
126
-
127
-
128
-
129
-
130
-
131
-
132
-
133
-
134
-
135
-
136
-
137
-
138
-
139
-
140
-
141
-
142
-
143
-
144
-
145
-
146
-
147
-
148
-
149
-
150
-
151
-
152
-
153
-
154
-
155
-
156
-
157
-
158
-
159
-
160
-
161
-
162
-
163
-
164
-
165
-
166
-
167
-
168
-
169
-
170
-
171
-
172
-
173
 |
 |
