Canon EOS 6D Instruction Manual - Page 70
Setting the IP Address, When entering numbers such as IP
 |
View all Canon EOS 6D manuals
Add to My Manuals
Save this manual to your list of manuals |
Page 70 highlights
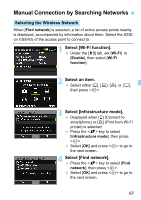
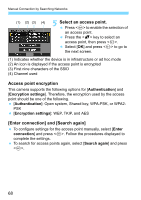
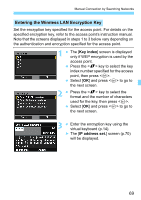
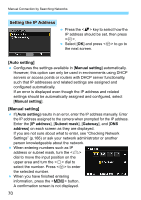
Manual Connection by Searching Networks Setting the IP Address Press the key to select how the IP address should be set, then press . Select [OK] and press to go to the next screen. [Auto setting] Configures the settings available in [Manual setting] automatically. However, this option can only be used in environments using DHCP servers or access points or routers with DHCP server functionality, such that IP addresses and related settings are assigned and configured automatically. If an error is displayed even though the IP address and related settings should be automatically assigned and configured, select [Manual setting]. [Manual setting] If [Auto setting] results in an error, enter the IP address manually. Enter the IP address assigned to the camera when prompted for the IP address. Enter the [IP address], [Subnet mask], [Gateway], and [DNS address] on each screen as they are displayed. If you are not sure about what to enter, see "Checking Network Settings" (p.166) or ask your network administrator or another person knowledgeable about the network. When entering numbers such as IP address or subnet mask, turn the dial to move the input position on the upper area and turn the dial to select the number. Press to enter the selected number. When you have finished entering information, press the button. A confirmation screen is not displayed. 70
-
 1
1 -
2
-
3
-
4
-
5
-
6
-
7
-
8
-
9
-
10
-
11
-
12
-
13
-
14
-
15
-
16
-
17
-
18
-
19
-
20
-
21
-
22
-
23
-
24
-
25
-
26
-
27
-
28
-
29
-
30
-
31
-
32
-
33
-
34
-
35
-
36
-
37
-
38
-
39
-
40
-
41
-
42
-
43
-
44
-
45
-
46
-
47
-
48
-
49
-
50
-
51
-
52
-
53
-
54
-
55
-
56
-
57
-
58
-
59
-
60
-
61
-
62
-
63
-
64
-
 65
65 -
 66
66 -
 67
67 -
 68
68 -
 69
69 -
 70
70 -
 71
71 -
 72
72 -
 73
73 -
 74
74 -
 75
75 -
76
-
77
-
78
-
79
-
80
-
81
-
82
-
83
-
84
-
85
-
86
-
87
-
88
-
89
-
90
-
91
-
92
-
93
-
94
-
95
-
96
-
97
-
98
-
99
-
100
-
101
-
102
-
103
-
104
-
105
-
106
-
107
-
108
-
109
-
110
-
111
-
112
-
113
-
114
-
115
-
116
-
117
-
118
-
119
-
120
-
121
-
122
-
123
-
124
-
125
-
126
-
127
-
128
-
129
-
130
-
131
-
132
-
133
-
134
-
135
-
136
-
137
-
138
-
139
-
140
-
141
-
142
-
143
-
144
-
145
-
146
-
147
-
148
-
149
-
150
-
151
-
152
-
153
-
154
-
155
-
156
-
157
-
158
-
159
-
160
-
161
-
162
-
163
-
164
-
165
-
166
-
167
-
168
-
169
-
170
-
171
-
172
-
173
 |
 |
