Canon EOS 6D Instruction Manual - Page 35
Connect to the camera., Perform further settings., Save the settings., Settings name, Connection
 |
View all Canon EOS 6D manuals
Add to My Manuals
Save this manual to your list of manuals |
Page 35 highlights
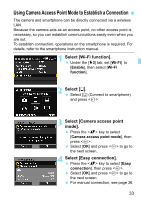
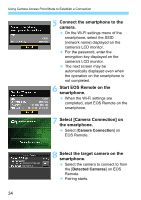
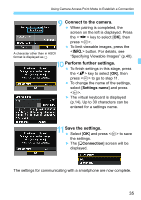
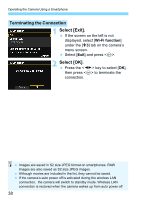
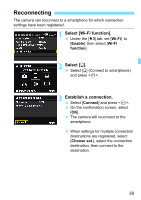
Using Camera Access Point Mode to Establish a Connection 9 Connect to the camera. When pairing is completed, the screen on the left is displayed. Press the key to select [OK], then press . To limit viewable images, press the A character other than in ASCII format is displayed as 8. button. For details, see "Specifying Viewable Images" (p.40). 10 Perform further settings. To finish settings in this stage, press the key to select [OK], then press to go to step 11. To change the name of the settings, select [Settings name] and press . X The virtual keyboard is displayed (p.14). Up to 30 characters can be entered for a settings name. 11Save the settings. Select [OK] and press to save the settings. X The [qConnection] screen will be displayed. The settings for communicating with a smartphone are now complete. 35
-
 1
1 -
2
-
3
-
4
-
5
-
6
-
7
-
8
-
9
-
10
-
11
-
12
-
13
-
14
-
15
-
16
-
17
-
18
-
19
-
20
-
21
-
22
-
23
-
24
-
25
-
26
-
27
-
28
-
29
-
 30
30 -
 31
31 -
 32
32 -
 33
33 -
 34
34 -
 35
35 -
 36
36 -
 37
37 -
 38
38 -
 39
39 -
 40
40 -
41
-
42
-
43
-
44
-
45
-
46
-
47
-
48
-
49
-
50
-
51
-
52
-
53
-
54
-
55
-
56
-
57
-
58
-
59
-
60
-
61
-
62
-
63
-
64
-
65
-
66
-
67
-
68
-
69
-
70
-
71
-
72
-
73
-
74
-
75
-
76
-
77
-
78
-
79
-
80
-
81
-
82
-
83
-
84
-
85
-
86
-
87
-
88
-
89
-
90
-
91
-
92
-
93
-
94
-
95
-
96
-
97
-
98
-
99
-
100
-
101
-
102
-
103
-
104
-
105
-
106
-
107
-
108
-
109
-
110
-
111
-
112
-
113
-
114
-
115
-
116
-
117
-
118
-
119
-
120
-
121
-
122
-
123
-
124
-
125
-
126
-
127
-
128
-
129
-
130
-
131
-
132
-
133
-
134
-
135
-
136
-
137
-
138
-
139
-
140
-
141
-
142
-
143
-
144
-
145
-
146
-
147
-
148
-
149
-
150
-
151
-
152
-
153
-
154
-
155
-
156
-
157
-
158
-
159
-
160
-
161
-
162
-
163
-
164
-
165
-
166
-
167
-
168
-
169
-
170
-
171
-
172
-
173
 |
 |
