Canon PC300 Instruction Manual - Page 152
Job Button Settings, Select the job button Shared Job Button or My Job
 |
View all Canon PC300 manuals
Add to My Manuals
Save this manual to your list of manuals |
Page 152 highlights
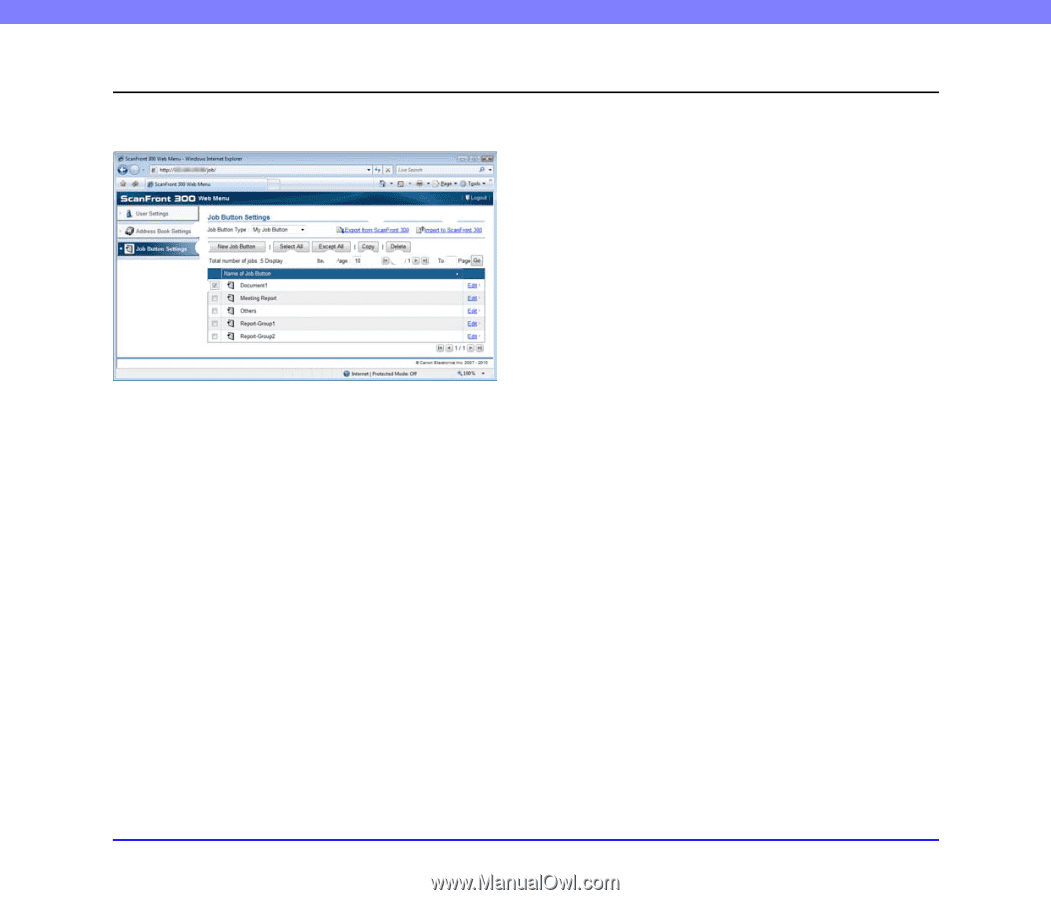
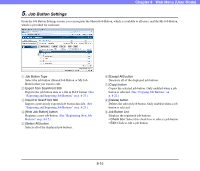
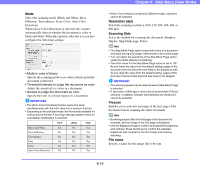
Chapter 8 Web Menu (User Mode) 5. Job Button Settings From the Job Button Settings screen, you can register the Shared Job Button, which is available to all users, and the My Job Button, which is provided for each user. a b c d e f gh i a Job Button Type Select the job button (Shared Job Button or My Job Button) that you want to edit. b Export from ScanFront 300 Exports the job button data as a file in DAT format. (See "Exporting and Importing Job Buttons" on p. 8-23.) c Import to ScanFront 300 Imports a previously exported job button data file. (See "Exporting and Importing Job Buttons" on p. 8-23.) d [New Job Button] button Registers a new job button. (See "Registering New Job Buttons" on p. 8-17.) e [Select All] button Selects all of the displayed job buttons. f [Except All] button Deselects all of the displayed job buttons. g [Copy] button Copies the selected job button. Only enabled when a job button is selected. (See "Copying Job Buttons" on p. 8-22.) h [Delete] button Deletes the selected job button. Only enabled when a job button is selected. i Job Button List Displays the registered job buttons. • Check box: Select this check box to select a job button. • Edit: Click to edit a job button. 8-15
-
 1
1 -
2
-
3
-
4
-
5
-
6
-
7
-
8
-
9
-
10
-
11
-
12
-
13
-
14
-
15
-
16
-
17
-
18
-
19
-
20
-
21
-
22
-
23
-
24
-
25
-
26
-
27
-
28
-
29
-
30
-
31
-
32
-
33
-
34
-
35
-
36
-
37
-
38
-
39
-
40
-
41
-
42
-
43
-
44
-
45
-
46
-
47
-
48
-
49
-
50
-
51
-
52
-
53
-
54
-
55
-
56
-
57
-
58
-
59
-
60
-
61
-
62
-
63
-
64
-
65
-
66
-
67
-
68
-
69
-
70
-
71
-
72
-
73
-
74
-
75
-
76
-
77
-
78
-
79
-
80
-
81
-
82
-
83
-
84
-
85
-
86
-
87
-
88
-
89
-
90
-
91
-
92
-
93
-
94
-
95
-
96
-
97
-
98
-
99
-
100
-
101
-
102
-
103
-
104
-
105
-
106
-
107
-
108
-
109
-
110
-
111
-
112
-
113
-
114
-
115
-
116
-
117
-
118
-
119
-
120
-
121
-
122
-
123
-
124
-
125
-
126
-
127
-
128
-
129
-
130
-
131
-
132
-
133
-
134
-
135
-
136
-
137
-
138
-
139
-
140
-
141
-
142
-
143
-
144
-
145
-
146
-
 147
147 -
 148
148 -
 149
149 -
 150
150 -
 151
151 -
 152
152 -
 153
153 -
 154
154 -
 155
155 -
 156
156 -
 157
157 -
158
-
159
-
160
-
161
-
162
-
163
-
164
-
165
-
166
-
167
-
168
-
169
-
170
-
171
-
172
-
173
-
174
-
175
-
176
-
177
-
178
-
179
-
180
-
181
-
182
-
183
-
184
-
185
-
186
-
187
-
188
-
189
-
190
-
191
-
192
-
193
 |
 |