Canon PC300 Instruction Manual - Page 174
or Windows Server 2008 R2., Cannot scan from the Home - troubleshooting
 |
View all Canon PC300 manuals
Add to My Manuals
Save this manual to your list of manuals |
Page 174 highlights
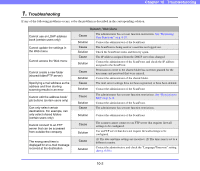
Chapter 10 Troubleshooting The sender's address is not displayed at the destination of an e-mail message Cannot connect to the network (IP address conflict problem) Cannot connect to the network (LAN cable connection problem) Cannot connect to the network (device name conflict problem) Cannot delete a folder Cannot scan from the Home screen (certain users only) Cannot log in Cannot browse shared folders during address registration. Cause Solution Cause Solution Cause Solution Cause Solution Cause Solution Cause Solution Cause Solution Cause Solution Cause Solution The e-mail addresses of the user and administrator have not been registered. (See p. 6-7 and p. 6-32.) Contact the administrator, and register the e-mail addresses. The IP address that was set is already being used by another device. Contact the system administrator of the network, and change the IP address setting. The LAN cable is not connected properly. Check the connections of the LAN cable. The device name that was set is already being used by another device. Contact the system administrator of the network, and change the device name setting. When you install two or more ScanFront scanners, take care to ensure duplicate device names are not set. Data has been saved to the folder. Contact the administrator of the shared folder. Permission to change the shared folder has not been granted for the user name and password that were entered. Contact the administrator of the shared folder. The administrator has set user function restrictions. See "Use only Job Buttons" on p. 6-10. Contact the administrator of the ScanFront. Uppercase and lowercase letters were not entered correctly. (See p. 8-3 and p. 5-5.) Enter the uppercase and lowercase letters for the user name and password correctly. You are attempting to browse folders on a computer running Windows 7 or Windows Server 2008 R2. Enter the full path of the shared folder manually. Alternatively, enter the computer name and path up until the top-most folder of that computer. (You can then press the [Browse] button and specify the rest of the path in the screen that appears.) 10-3
-
 1
1 -
2
-
3
-
4
-
5
-
6
-
7
-
8
-
9
-
10
-
11
-
12
-
13
-
14
-
15
-
16
-
17
-
18
-
19
-
20
-
21
-
22
-
23
-
24
-
25
-
26
-
27
-
28
-
29
-
30
-
31
-
32
-
33
-
34
-
35
-
36
-
37
-
38
-
39
-
40
-
41
-
42
-
43
-
44
-
45
-
46
-
47
-
48
-
49
-
50
-
51
-
52
-
53
-
54
-
55
-
56
-
57
-
58
-
59
-
60
-
61
-
62
-
63
-
64
-
65
-
66
-
67
-
68
-
69
-
70
-
71
-
72
-
73
-
74
-
75
-
76
-
77
-
78
-
79
-
80
-
81
-
82
-
83
-
84
-
85
-
86
-
87
-
88
-
89
-
90
-
91
-
92
-
93
-
94
-
95
-
96
-
97
-
98
-
99
-
100
-
101
-
102
-
103
-
104
-
105
-
106
-
107
-
108
-
109
-
110
-
111
-
112
-
113
-
114
-
115
-
116
-
117
-
118
-
119
-
120
-
121
-
122
-
123
-
124
-
125
-
126
-
127
-
128
-
129
-
130
-
131
-
132
-
133
-
134
-
135
-
136
-
137
-
138
-
139
-
140
-
141
-
142
-
143
-
144
-
145
-
146
-
147
-
148
-
149
-
150
-
151
-
152
-
153
-
154
-
155
-
156
-
157
-
158
-
159
-
160
-
161
-
162
-
163
-
164
-
165
-
166
-
167
-
168
-
 169
169 -
 170
170 -
 171
171 -
 172
172 -
 173
173 -
 174
174 -
 175
175 -
 176
176 -
 177
177 -
 178
178 -
 179
179 -
180
-
181
-
182
-
183
-
184
-
185
-
186
-
187
-
188
-
189
-
190
-
191
-
192
-
193
 |
 |
